Cream of Celery Soup…An Exercise in Better Uses for Celery.

0

Celery…conjuring memories of low-fat diets since the 1980’s. Relegated to the crudite platter.

3f4af3b5598118a7f4b9479762c8e9be

Ahhh…FANCY ants on a log. You can do better celery. You can do better. (Pic snagged from Pinterest).

Such a sad existence. Now, I’m not telling you to spearhead some sort of Celery Festival equipped with it’s own Celery Queen riding astride a large green float and waving wistfully to the crowd. What I am saying is you should give celery a second try…just not in the form you’re familiar with. Paired with some really good butter and a whole lotta cream your ol’ standby celery can go from the dark, lonely corners of the vegetable bin to something pretty fabulous. I stumbled upon cream of celery soup (no, not the red-and-white canned kind) when I was trying to use up a couple of bunches of celery that were going nowhere fast. It was chilly at the time and a big ol’ bowl of soup sounded pretty delightful. Peering into my generally packed-to-the-hilt fridge, I found a motley crew of a stick of butter, a pint of cream, our sad celery, and some chicken stock. With a serious case of the lazies, I donned my kitchen apron over my PJs and got to work. A little saute with some bits of onion in a few tablespoons of butter, simmered in chicken stock, pureed, and topped off with cream—winner! Best news is it is packed with nutrients and no flour is required to thicken the soup (feel free to roll with a classic roux, but I really prefer it without). The good portion of fat keeps you full too (ahem-not to mention it tastes ah-mazing!). Tonight this little beauty serves as a starter to our pre-hurricaine dinner. No better time to clear out the far reaches of the fridge!

Cream of Celery Soup

  • 2 bunches of celery (about 350g)
  • 1/2 small onion (about 50g)
  • 1.5 cups chicken stock
  • 0.5 cup of heavy whipping cream
  • 1 small bay leaf
  • salt to taste
  • peppercorn melange to taste (black pepper works well too)

Roughly chop the celery and onions while melting the butter in a large saute pan. After the butter is finished foaming, place the celery and onions in and saute until beginning to soften. Add 1.5 cups of chicken stock and the bay leaf and simmer until all bits are cooked through and soft. Remove the bay leaf, remove the pan from the heat, and cool a bit. Process until smooth in a heavy duty blender (like a Vitamix!). Return the soup to your pan and slowly stir in the heavy cream. Add a small amount of water or cook off a little liquid to perfect the consistency (since we didn’t use a roux as a thickener). Adjust seasonings.

You can certainly strain the small bits of celery fiber through a fine strainer (like a bouillon strainer or fine chinois cap), but most of the time I prefer to leave them in for a little heft. A super smooth, strained soup does however, make a nice accoutrement to a fine dinner. Add a drizzle of chive or parsley oil for an added punch of flavor and a little color. And just like that, your sad and lonely celery becomes a star!

turnip-soup


Save

Cauliflower Faux Fried Rice

0

IMG_3566

So. Yeah. This cauliflower craze. It’s a love and hate thing. I love that I can eat some of my favorite evil comfort foods without furthering the heart disease caused by my love-affair with The Pig. Often healthful recipes meant to mimic comfort foods are almost universally straight up disastrous. Or maybe I’m just THAT much in love with all that is intent on shortening my life on this planet? That means I’ve tried a lot of utterly disappointing faux recipes involving cauliflower. Failures include recipes that still taste like cauliflower, those that are too soggy, ones that fall apart, and ones that are too dry or have no flavor, and on and on AND ON. After a lot of trialing, I was finally able to conjure up some stir fried rice that comes really, really (I mean really!) close to the real deal. Indeed, this stuff was so good that it instantly transported me to eating fried rice as a child in the old international food court that used to sit off of N. Market Street. When I make this, I make a vat and eat it all week. It’s seriously that addicting.

The keys to whipping up some of this delicious faux fried rice include pre-cooking the ‘rice’, squeezing the liquid out of the cauliflower rice, getting a little caramelization on the rice, and adding some flavorful ingredients. The caramelization/drying step takes a little bit of time, but no longer than cooking a pot of rice and busting out a wok. Also, feel free to get a little freaky and throw in whatever ingredients you like best-just like fried rice, this little gem is forgiving. Be prepared to fall in love with something that is actually good for you!

Faux Fried Rice (Cauliflower Fried Rice)

  • 1 head cauliflower, riced, steamed, and squeezed free of liquid
  • 1/2 small onion, diced
  • 1/2 cup of frozen green peas
  • 2 medium carrots, diced
  • 2 eggs, whisked
  • 4 ounces of ham (or pork, or chicken, or shrimp)
  • 2 tsp Sesame oil
  • 1 TBSP Ponzu sauce (in the ‘international’ section of your grocery store or make some)
  • 1 TBSP soy sauce or liquid aminos
  • 1 TBSP rice seasoning
  • 1/4 tsp white pepper
  • scallions for garnish

Preheat your oven to 375 degrees. Rice, steam, and squeeze the fluid out of your cauliflower like the technique used in our cauliflower crackers and cauliflower tater tots. On a parchment-lined baking sheet, spread your cauliflower mixture in a thin layer. Cook until lightly browned a slightly dried a bit. This step adds flavor, decreases the familiar cauliflower flavor, and helps the ‘rice’ grains stay separated when adding the other ingredients (don’t skip it!). Cool your cauliflower rice on the pan. Break up any clumps and set aside. Heat a small amount of oil in a non-stick pan over medium heat. Add your carrots and saute until beginning to soften. Add your onions and saute until translucent. Add your peas and saute until just heated through. Remove all vegetables from pan. Place the ham in your pan and cook until edges are browned. Remove the ham from the pan and add to the vegetables. Assure the pan is adequately lubricated with oil. Add your whisked eggs and scramble, leaving them in bits about half the size of your pinkie finger (any smaller and you lose their texture and flavor amongst everything else). When you are done scrambling your eggs, return the ham and vegetables to the pan. Add your cauliflower ‘rice’. Add 2 tsp sesame oil, 1 TBSP ponzu sauce, 1 TBSP soy sauce or liquid aminos, 1/4 tsp white pepper, and 1 TBSP rice seasoning. Stir gently to incorporate the ingredients and heat the cauliflower rice through. Serve and enjoy tremendously! If you’re in the mood to wrestle with a little food guilt, serve your healthy fried rice with Shanghai Red Cooked Pork Belly or Chinese Red Cooked Beef. Grilled chicken or shrimp would be a great pairing too. You won’t be disappointed!


Cauliflower Tater Tots

2

Everybody loves a tater tot. Eh-vreh-body.

cauliflower tots

Tater tots and ligers. Both favorites.

A place The Hubbs and I hit up a few times a year has straight up ol’ skool tater tots and ketchup. Before going there, I had not indulged in a tater tot in about 20 years. And then, just like that, I was totally obsessed. For obvious health reasons, being obsessed with tater tots is not a good thing. So, I set out to make a healthy alternative. A good place to start for carb-bread substitutes is cauliflower. Man, I was pleasantly surprised! A little snappy sauce and they’re a perfect guilty pleasure packed with nutrients. AND they’re baked. You’re welcome!

Cauliflower Tater Tots

  • 1 head of Cauliflower, riced, and squeezed of it’s liquid
  • 2 eggs, whisked
  • 1/4 cup of sharp cheddar cheese
  • 1 TBSP almond flour
  • 1/4 tsp onion powder
  • 1/8 tsp white pepper
  • salt to taste

Prepare a baking sheet with a parchment sheet that has been lightly sprayed with high-heat cooking oil or cooking spray. Rice, steam, cool, and de-juice your cauliflower like the technique used in our cauliflower crackers.

cauliflower tater tots

Cut your head of cauliflower into florets

cauliflower tater tots

Next up…the Cauliflower is ‘riced’ and steamed. Doing so allows us to get the most moisture out of the cauliflower when you give it the big squeeze.

Next, add the eggs, cheese, almond flour, onion powder, white pepper, and salt.

cauli tots

Throw in all of the other ingredients and mix well.

Mix the ingredients well. Preheat your oven to 375 degrees Fahrenheit. Using the space where your hand meets your fingers, form your cauli tots by gently squeezing and rolling a small amount of the mixture while lightly tapping down the ends to create the familiar barrel shape. Place your tots on the parchment, leaving a bit of space between each one. When all of your tots are lined up, spray the tops lightly with high-heat cooking oil or cooking spray.

cauliflower tots

Your tots are ready to pop into the oven. Having tots without the guilt and carbs is so worth the wait!

Pop your tots in the oven and bake for 12 minutes or until browned on the bottom. Roll each tot a quarter of a roll and cook 5 or so minutes until the new bottom is browned. Repeat the quarter-turn roll and cook another 5 minutes or so until the bottom is browned. Repeat the roll one last time to make sure all sides are browned and crisp.

cauliflower tater tots

Ermagahhhhd. Tots! Even Napoleon Dynamite would stuff these into his pants pockets!

I’m a big fan of serving these tots with a mayo-ketchup-horseradish sauce. After all, if the tots are all full of goodness you can get a little cray cray with your condiments!

Cauli tots

Eat them up!

White Onion Soup

0

Search ‘onion soup recipes’ and you’ll find almost 6 million results…nearly all of them concerned with the French onion soup we’ve all grown to love. If the beefy, buttery, cheese-and-crouton soup is peasant food, then white onion soup is it’s long-lost, classy cousin. The two are in no way similar other than being soup and having a base of onions. The classic French onion soup calls for caramelized onions and beef broth while white onion soup calls for softened onions and cream. One is deep brown in color while the other is a pristine snow white palate. As far as flavor, white onion soup does taste of onions (obviously) but not overwhelmingly so while floral notes peak through a creamy, buttery base. It’s divine. And simple. Just a handful of ingredients are required to create a truly delightful bowl of soup. It’s a great meal on it’s own, paired with a salad, or as a starter for beef, lamb, and pork meals. Along with cream of celery, it’s one of my ‘go to’ soups. Even if you’re not crazy about onions, give white onion soup a try (just get those tissues ready-it’s a pile of onion to cut!).

IMG ONION

I couldn’t help it!

White Onion Soup

  • 4 TBSP butter
  • 3 pounds of onions, sliced
  • 1 stalk of celery, diced
  • 4 cups of chicken stock
  • 1 cup heavy whipping cream
  • 1/4 tsp white pepper
  • 2 TBSP grated Parmesan cheese
  • Salt to taste

Melt the butter in a large pot over medium heat. When the butter’s foam subsides, add the celery and cook until it begins to soften, a few minutes. Add the onion and cook until translucent and soft, about 10 minutes. Reduce the heat to medium low and continue to cook the onions until they are very soft, stirring frequently, about 20 minutes.

IMG_3085

The onions need to be very soft, but don’t let them brown.

Do not let the onion brown. Add the chicken stock and process in small batches in a blender until smooth (if you are using a regular blender, this may take 2-4 minutes per batch). Return the soup to the pot and add white pepper and cream. Heat thoroughly. Add 2 TBSP of parmesean. Salt to taste.

IMG_2714

This soup is so good on it’s own that you don’t need many accouterments. A little chive oil and peppercorn melange suits just fine.

IMG_3089

Roasted walnut oil, roasted beets, and red onion jam fit nicely too. Golden crunchy potato strings or cheesy croutons and white truffle oil would work as well.

My favorite additions are a dotting of chive oil and a sprinkling of peppercorn melange. We’ve also tried walnut oil, roasted beets, and red onion jam. I’m itching to try some crunchy potato strings or cheesy croutons and white truffle oil.


Nutrition per 8 oz. cup: Cal 212 kcal, Fat 15.1g, Sat Fat 9.7g, Chol 44.4mg, Carb 15.1g, Fiber 2.6g, Sugar 7.2g, Protein 5.3g

Onions have higher levels of tryptophan, B vitamins and vitamins A and C, copper, manganese, and phosphorus. Onions are a prebiotic and are high in polyphenols, expecially flavanoids like quercetin.


Cucumber Sour Cream and Onion Chips

1
Cucumber Chips

MMMM…Potato Chips. I can’t even bring them into my house. Especially Sour Cream and Onion potato chips. Seriously-I.Have.No.Will.Power!

I’m not the only one that has a potato chip fetish, er, problem. In recent years the potato chip market generated over 16 billion in revenues per year. I don’t turn my nose up at any chip but I’m a complete and total sucker for Sour Cream and Onion potato chips. I don’t know that the chip is where it’s at when talking about Sour Cream and Onion chips. After all, I have been known to lick the powdery dusting off of them when in a glassy-eyed potato chip daze. So, in my continual search for eliminating processed and high glycemic foods in my diet, I began thinking about ways to get the same Sour Cream and Onion fix without all the muffin top-inducing effects of a traditional potato chip. I think Wilford Brimley had it right….

Cucumber potato chips

Yep. Tha ‘Beetus. Nobody wants it.

After trial and error, I think the Cucumber Sour Cream and Onion Chip is where it’s at. Cucumbers are flavor neutral enough to not get in the way of the tart flavorings and can be easily sliced thin enough to get some crisp on when placed in the dehydrator. Cooled and packed in a Ziploc with a desiccant pack, they’ll stay crisp enough to keep around for a week or so. Feel free to make double or triple the recipe…these things are seriously addictive. We can’t even wait for them to cool down before we’re going at ’em like rabid dogs. Trust me on this.

Cucumber Sour Cream and Onion Chips

  • 2 cucumbers
  • 2 TBSP Light Tasting Olive Oil
  • 2 TBSP Cultured Buttermilk Powder
  • 1 TBSP onion powder
  • 1 tsp dried dill
  • 1/2 tsp garlic powder
  • 1/2 tsp salt
  • Food processor or mandoline (get yourself a handheld one here)
  • Dehydrator with mesh inserts (allows drying of smaller or thin items)

Whisk olive oil, buttermilk powder, onion powder, dill, garlic powder, and salt in a bowl.

Cucumber Chips

Mixing up the ‘chip’ flavoring. The cultured buttermilk powder really does the trick!

Wash and peel your cucumbers as the skin can get a little bitter when dehydrated. Slice your cucumbers at about 2-3 mm thickness.

Sour Cream and Onion Cucumber Chips

Thin slices = less time until you eat chips!

Working in small batches (about 1/2 cup), very gently toss the cucumber slices in the olive oil mixture.

Cucumber Chips

Gently coat the cucumber in the olive oil mixture. Working in small batches will help prevent the salt in the olive oil mixture from drawing out too much water from the cucumber and/or causing the cucumber to fall apart.

Place in single layers on dehydrator racks and dehydrate according to manufacturer settings until crisp.

Sour Cream and Onion Cucumber Chips

Ready to dehydrate. The waiting is the hardest part. Make enough for a week if your dehydrator is large enough. You’ll need them.

Mine generally take 6 or so hours at 135 degrees.

Cucumber Chips

Super crisp and melt in your mouth if cut at 1mm…the crisp and body of a potato chip at 2-3mm. Either way you’re going to need a lot of these…they’re just too good to put down. Forget a standard potato chip…I’m not even looking back!

Cool completely and store in a Ziploc with a desiccant pack in the refrigerator. Next time your snack attack hits…reach for your cucumber chips and you won’t have to feel bad for a minute!

Who needs Crackers and Chips…I’ve got Cabbage!

0
Cabbage chips

Need a little chip for your work week (or any other time) snack? Try cabbage chips! They’re big enough to hold some serious eats and let you snack until your heart’s content with no guilt. Beach season here I come!

‘Tis the season of sweat. The more your parts aren’t sticking together, the better. Am I right? Much like the rest of the country, I’m always looking for ways to reduce my habitus. Cutting back on carbs always seems to work wonders. But what’s a girl to snack on during movie time? Or who’s gonna help you with your hummus, guacamole, or olive tapenade during lunch time? Cabbage, that’s who. Wait, what? Are you suddenly conjuring ideas of digging into a steamy bowl of braised cabbage while renting 50 Shades of Grey? Flashes of guacamole atop your pile of shredded cabbage? Probably. But that’s not what I mean.

So, undoubtedly you’ve heard of the A-lister favorite, kale chips. Yes, they are good, but they’re a bit like seaweed, get soft fast, and there’s no putting any kind of dip on a kale chip. You could make up some cauliflower crackers, but they do indeed taste a bit like cauliflower (amazing, I know). So, in my hunt for something with a least a little crunch, no grains, fairly flavor-neutral, and big enough to put some dip on…I found cabbage. Much like using collards in place of bread or wraps, using cabbage in place of chips or crackers wipes out grain consumption and reduces carbs and calories.

Trust me, try these and they’ll be a new tool in your fight for wearing your favorite thong bikini!

Cabbage Chips

  • 1 head of cabbage (use regular or savoy), separated into leaves, stems removed
  • Salty water for blanching
  • Ice bath
  • Paper towels
  • Salt and pepper to taste
  • Dehydrator

Gently peel the leaves of cabbage away from head, keeping the leaves intact. Remove stems and blanch. Plunge leaves into ice bath. Drain and pat dry with paper towels (or tea towels to reduce waste). Cut leaves into desired size (for crackers I usually split larger leaves down the middle and keep smaller leaves intact). Place the leaves in a single layers in your dehydrator and season them to taste with salt and pepper.

cabbage chips

Cabbage leaves ready for dehydration. Three hours until crunchy goodness.

Dehydrate according to your model’s directions until the leaves are crisp. Mine took 3 hours at 135 degrees. Let the chip-crackers cool completely. To keep them crisp all week, place them in a large Ziploc bag with a desiccant pack and store in the fridge. Feel free to snack away-that thong bikini will still fit!

cabbage chips

These chips hold up. Although they’re difficult to dig into dip with, they’re perfect for smothering in guacamole, salsa, hummus, tapenade, or otherwise. They’ll bend a little, but won’t crumble like kale chips. They’re the perfect go to instead of crackers or pita bread points.

The Mightly Collard Wrap

1
Collard Wraps

The mighty collard. Once saved for cookin’ up ‘a mess’ on New Year’s Day and now making an appearance in your work week lunchbox!

The mighty collard. They’ve been eaten in the South for centuries and around the world since at least Ancient Roman times. African, South American, and Middle Eastern countries all have their own methods of preparing them as main or side dishes. Generally in the South, we slow braise ‘a mess’ of them with salted or smoked meat, onions, pepper, vinegar, and a dash of sugar (and sometimes tomato). It’s an all day event that can both warm and stink up a house. Summertime in the South where temperatures are hotter than the hinges of Hell is not the time for a bubbling cauldron of greens no matter how delicious the outcome.

If you still want to get in some of the great properties of collards (vitamin C, fiber, and antiviral, antibacterial, and anticancer properties) but want to maintain your ‘air of elegance’ during the heat of summer, try using them as sandwich wraps instead. It’s a great option for those sensitive to wheat or grain and they are super easy to make, keep for days in the fridge, freeze easily, and pack a ton of flavor. For those looking to shed a few pounds in order to squeeze into your speedo, they only pack a few calories per leaf. You can also use the same preparation here and then slice thinly and add to cold salads. If you’re daring, try blanching mustard greens or horseradish tops to use as your wraps or in salads. It’s best to prepare a mess ahead of time and vacuum and freeze in batches to save yourself some work.

Collard Wraps

  • Mess of whole leaf collards (usually come in 2 -3 bunches), stems removed
  • Salty water for blanching
  • Ice bath

Working in small batches, blanch collards and submerge in ice bath. Drain on layers of paper towels. Layer in groups of 2-3 leaves for each wrap and place in an airtight container for use during the work week. Alternatively, layer in groups, roll up, and vacuum pack. Freeze for later use.

collard wraps

Blanched collard with stem removed. Blanching makes the collard less leathery and a bit more sweet.

collard wraps

Layer 2-3 blanched leaves, making sure to overlap the slits where the stems once lived.

I generally use 2-3 leaves per wrap, overlapping the slits where the stems once lived (otherwise your stuffing sneaks out). Spread your filling out and proceed to wrap like burrito.

collard wraps

Spread your filling out a bit along one edge.

FullSizeRender 56

Collard burrito!

I keep enough for 3 or so wraps in the fridge to use during the work week. I always have some on hand since we work in big batches and freeze them. No more running to the store for bread or wraps (they defrost quickly in their vacuum bag in a sink of warm water)! Thinner greens like mustard or horseradish take a little care in handling so they don’t tear. Try mustard greens with egg salad and bacon or horseradish greens with grilled beef. You won’t be disappointed!

collard wraps

Low carb, grain free wraps AND collardy goodness year round. Win! Win!

DIY Black Limes (and why you need them!)

0
IMG_9890

Black limes, or dried limes, are a magical way to give new life to your cooking.

‘What is a Black Lime’, you say? On one hand it’s simply a dusty, blackish-brown, dehydrated whole lime common in Middle Eastern cuisine. On the other hand, it’s 100% magic. Yup. Magic. I frankly don’t even remember where I heard about dried limes, but I can tell you when I first tasted their magical goodness: Okra and chicken liver stew. I stopped by a restaurant near work one Friday night after a loooong day at work, figuring I’d just go ahead and get dinner, a glass of wine, and kill some time while traffic died down. There were so many normal things about that stew—the familiar little carrot squares, peas, corn kernels. Okra, of course. Perfectly cooked chicken livers (no sawdust or rubber to be found) and a tomato broth equipped with those little sparkling dots of fatty goodness. But then there was some kind of tangy, fresh goodness. By all accounts, a stew that most likely started off with rendering some bacon fat should’ve sat a bit heavier, but it didn’t. It was so good I had it again later that weekend! I didn’t know then what the magical goodness in that stew was, but the first time I cooked with dried limes I was immediately brought back to that stew. Dried limes. I’m 100% sure. I’ve been tempted to ask the Chef since I see him in the mornings unloading the truck from the market or feeding a little stray cat that hangs around, but I figure accosting him about the nuances of his cuisine might seem a bit whacko.

Back to the limes. Trust me on this. Either buy yourself a bag online or make your own. This is a great project for the winter since you’ll have your oven on low for a day or two. The flavor is bright and citrusy while also being earthy and grounding. They go well with heavier meats such as lamb and beef and also pair well with lighter soups and stews. They can be used whole or ground up. You’ll be hooked from the first bite!


Dried, or Black, Limes

  • Limes (go ahead and do a bunch while you’re at it!)
IMG_9843

Get yourself a big ol’ batch of lovely limes.

Blanch your limes in small batches and be sure to cool completely in the ice bath.

IMG_9844

After blanching your limes, make sure they are fully cooled in an ice bath.

Dry. Place the limes on a baking rack set on a baking sheet.

IMG_9846

After blanching the limes go into a low heat oven.

Place your limes in a 150-200 degree oven (depending on how low your oven goes-mine was 170 degrees). If the limes will fit in a dehydrator you have, even better (mine where a bit too big)! Let them rip, turning a couple of times a day, until completely dry.

IMG_9851

About a day in the limes begin to appear dry and change color. The oven mimics the drying effects of the traditional method of drying the limes in the sun.

When done, they will be slightly bigger than a ping-pong ball and feel light and hollow.

IMG_0125

About two or so days in the limes are black, light, and feel hollow.

If you’re not sure if they’re done, crack one open and you’ll find dark flesh that’s dry and flaky.

IMG_0122

When done, the interior is dry and flaky with the smallest sticky drops on the interior flesh.

Mine took about 2 days. The time to be dry will depend on the amount of juice in your limes. Be patient, they’re worth it! As a note, I did take mine out of the oven a couple of time to cook, then just let the oven cool a bit and popped them back in at 170 degrees. They tuned out perfectly.

IMG_9890

Lovely magical dried limes!


IMG_0135

Try dried limes in your next stew, soup, or sauce. Use them whole or grind them up. You’ll be looking for excuses to use them, I promise!


Grilled Corn

1
IMG_9526

Awesome grilled corn!

Being married to a Nebraska Boy, corn takes a special place in our house. We don’t eat it often, so when we do, it’s gotta hit the spot and hold you over until the next round. Now, I don’t discriminate when it comes to corn-I love it all. Creamed, boiled, steamed, or grilled in the husk. But we’d had grilled corn when we were out and about that was nothing short of awesome. It was sweet, corny, and speckled with little charred spots. But trying to reproduce this at home by way of grilling in the husk just didn’t produce the same effect. Finally we tried just slapping it on the grill sans husk. Perfecto! You can add lots of things to it (paprika, sour cream sauce, cheese, japapeno, etc.), but I think plain ol’ butter does the trick. This stuff is a great pair for anything grilled. Bonus? The dogs love, love, love to pick the cobs and get all the little bits off (Be careful to not let them eat the cob-it can’t be digested and can cause problems)! Not to mention it’s hilarious to watch them munch off the leftover kernels typewriter style. Happy dog and happy Cornhusker = Happy life!

Grilled Corn

  • As many ears of corn as you need
  • Butter
  • Salt
  • Hot grill

Score the husk near the bottom of the cob with a pairing knife. Remove the husk and silk. Place on a hot grill, turning occasionally, until the kernels darken a bit and char spots appear. Remove from the grill, brush with butter, and sprinkle with salt. Dig in. Don’t forget to share with your furry buddies (just make sure they don’t get ahold of the cob!).

IMG_9527

Grilled corn pairs well with just about everything!

Growing Microgreens at Home

4
IMG_8242

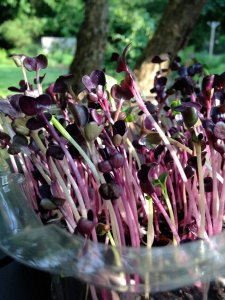
The wonderful world of microgreens!

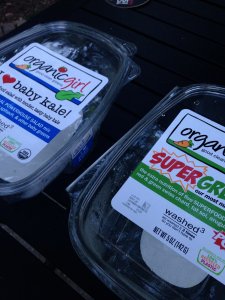
For some time I wondered what those precious little sprigs of greenery were perched atop my dishes when I was out and about eating. Some looked like pea shoots, others like clover, some purple, others red-tinged. And the flavor from each was distinct and super-concentrated. I was quite intrigued. Then, during a foray into sprouting, I discovered the microgreen. What exactly is a microgreen you ask? Technically it is a tiny green used for visual and flavor in dishes. Being intrigued, I set out to see how these little buggers were ‘made’. After much interweb digging, I ordered myself a hydroponic kit and set to work. Well, that was a failure. The trays were too big for one or two people to get through before they dried out (or grew mold). And I just couldn’t feel good about throwing out the growing mat after each ‘crop’. Bearing my Grandaddy’s predilection for liking to grow little things in little containers and a strong inkling not to be deterred, I tried the same trays with organic soil. Equal failure. Mold, rot, and dry soil. How was this so when they made it look so simple all over the interwebs? Then I stumbled onto the perfect solution. The humble grocery store lettuce container (I also like to blame this re-purposing phenomena on Grandaddy since his yard was full of blue Folgers coffee cans sprouting various experimental plants). You know the ones that your organic arugula, super greens, and baby kale come in? Yep. Those ones. That simple.

This is super easy, great for small places, and requires very little monetary input-dirt, seeds, and reusable container. And don’t worry, that 1/4 pound baggie of seeds may be $12 but it lasts a great, long while. Best yet, they add so much flavor to my daily salad that my dressing has simply become a drizzle of oils (any combination of olive, avocado, macadamia, walnut, almond, hazelnut, pumpkin seed, or herb-infused oils). Other than imagining I’m tearing through a Fairy Forest like Godzilla, these things are fantastic! So, over-active imagination aside, microgreen growing is every bit fantastic!

I start a new container every other day or so and that keeps me in mounds of microgreens for my daily lunch salad. There’s a certain satisfaction about watching them grow—a little, simple success in getting the seed to hatch and unfurl. And I can’t help but think of my friend Holly who is quite ingenious in growing herbs in small spaces-this adds a whole new landscape to small space and indoor gardening.


  • Re-purposed lettuce containers, as many as you’d like
  • 3 or so inches of organic soil per container
  • Seeds (try Johnny’s Seeds for great variety)
  • Fine mist spray bottle
  • Filtered water (or not, I really can’t tell a difference!)


First things first, the websites and videos will tell you to titer your water to a pH of 6. They’ll tell you this essential. Lies! Forever I spent bent over like a mad scientist titrating my filtered water. Then it hit me. Mother Nature doesn’t titrate water pH. And frankly, that step turned this simple, natural act into a pro-duc-tion. And I’m kinda lazy when it comes to that sort of thing. They also said to soak certain seeds. Yep. Not doing that either. I mean, you’re not creating DaVinci-style microgreens for restaurants. They’re for you…to eat. In my experience, it just didn’t make a difference. So I’m not durrin’ it!

I digress. Get yourself a some old lettuce, tomato, or mushroom containers.

IMG_8335

Re-purposed containers. The ones with hinged lids work great—no losing the lid! For those wanting to try seed varieties, use the tiny tomato packages with hinged lids and get sample packs of seeds.

And some little packs of seeds. Definitely try Johnny’s Seeds for variety.

IMG_8337

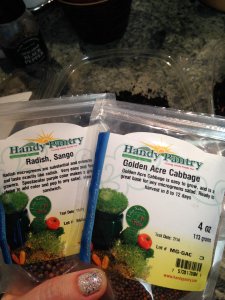
Get yourself some seed packs…I’ve even used packs of radish seeds from last season. Great way to use up the supply of seeds for that monstrous garden I never got around to planting!

Put a 3 or so inch layer of soil in your container. Even it out with the back of a spoon.

IMG_8338

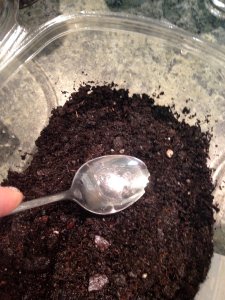
Place your soil and get it fairly even. No need to be perfect here, people. Just no big divots where seeds will settle en masse.

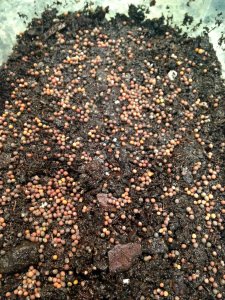
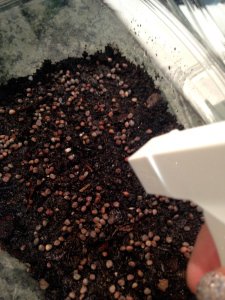
Dampen the soil with water. Sprinkle your seeds in an even layer on top and press them gently into the soil.

IMG_8339

Sowing the harvest!

Spray the seeds and top/lid of container to moisten. If you’re using an old styrofoam mushroom container, find a lid like a washed styrofoam meat tray, and use it as the top. The seeds need a few days of relative darkness to sprout (remember, don’t get too freaky about total darkness, as Mother Nature does shine a little sun on the buggers when in a natural setting).

IMG_8341

Just like in nature, keep these little buddies moist.

Place your dampened lid, and cover with a densely-woven kitchen or hand towel. This is to mimic the darker conditions the seeds experience in nature when you cover them with soil.

IMG_8343

Simulating Mother Nature’s darkness to induce sprouting.

And…now wait. Depending on the seed, it takes about 3 or so days to get sprouting and a bit of height. You’ll want to mist the inside of the lid daily or so to keep a bit of moisture in your container. When you get the first set of leaves and they are about 3 inches, take the lid off and let some sunlight in.

IMG_8347

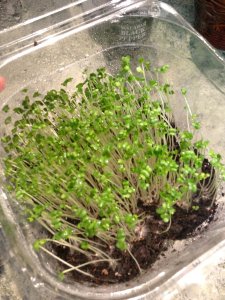
A little bit of height and the first set of leaves indicate the time to let a little sunlight in.

In another 2 days or so, I start mowing them down with some scissors near the soil line. For sunlight, I place mine on a shelf near a window in the laundry room. You can experiment with letting them grow a bit longer to where they get their first set of ‘true leaves’, but I can be as impatient as I am lazy. So, eat ’em when you’re ready.

IMG_8344

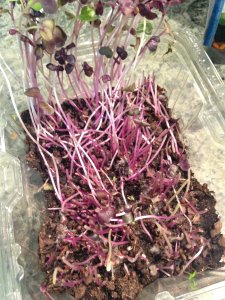
Half-mowed microgreens. Just cut near the soil line. Be careful not to bring the dirt with you. Or hey, your immune system might thank you for ingesting a wee bit of organic dirt!

If you don’t use them up quickly and the soil starts to dry out, tilt the container and water near the edges, letting the water flow towards the center of the soil. You don’t want them soaked, but drying out will kill them in a skinny minute. Watering ‘overhead’ can induce mold and rot, so avoid that method.

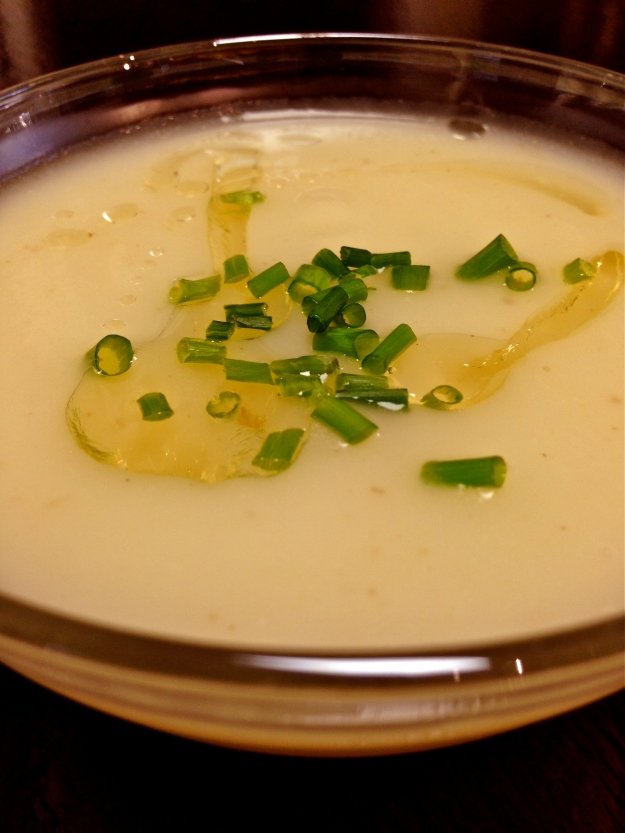
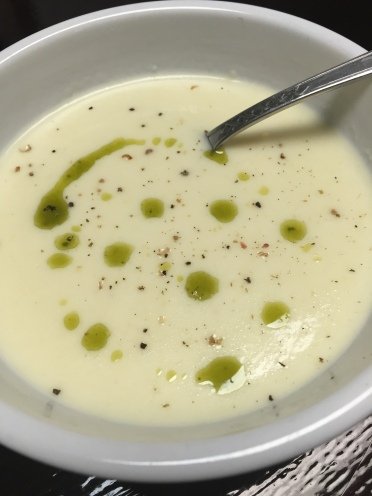
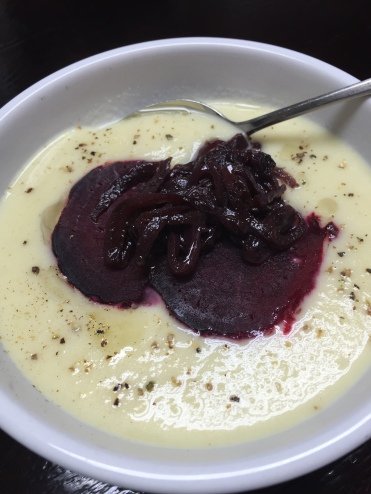
These buggers are great on salad, in sandwiches, or as garnishes on cold or warm dishes. The possibilities are endless! Bonus? You get the daily magic of creating food out of wee tiny seeds without having to go total Farmer Joe. And for you parents…can you say ‘summer project’? Let those little kiddos learn about how their food grows AND let them tend some tasty treats for you. You’re welcome!

Play with how long you let them grow, what types of seeds you use, and how often you start a new batch to find what suits your needs. You won’t be sorry!