Who Says Salad Can’t be for Breakfast?

3

I’ve heard of folks bellying up to a bowl of salad for breakfast just to pack in those vital nutrients first thing in the morning. And to tell you the truth, I thought they were crazzzzy. I mean, the word breakfast conjures up thoughts of creamy grits, crispy bacon, and fried eggs. Or maybe you’re a stack o’ pancakes lover. Or perhaps a big ol’ plate of biscuits and sausage gravy. Yeah, me too. Until I (or rather, my pants) decided it was time to cut out the carbs. Well, if you’re like me, this little salad gets you your breakfast fix AND packs in some salad greens. Not to mention it’s pretty darn tasty, too!

  • a couple of handfuls of salad greens, arugula was used here
  • 1 soft-boiled egg
  • 4 or so ounces of pulled pork (substitute bacon or Canadian ham if you’d like)
  • handful of grape tomatoes, halved
  • 1 TBSP (or more if you like) of bacon jam
  • 1 tsp bacon fat
  • 1 TBSP apple cider, champagne, or rose vinegar (or try kombucha)
  • 2 TBSP diced onions
  • 1/2 clove garlic, mashed and minced
  • pinch of red pepper flakes

Heat a pot of salted water over medium high heat until just bubbling. Add your egg gently. Put on the top and let it sit for 5 minutes for a runny yolk, and six minutes for a firmer, but not ‘done’ yolk. You can fry the egg to your liking or use a boiled egg too. When done, run under cool water and gently peel.

IMG_7288

Soft boil your egg…The Hubs did a little art work on the eggs, so I had an extra bit of fun doing this one up!

While the egg is doing its thing, heat the bacon fat in a nonstick skillet. Add the onions and garlic and saute until just tender. Add the bacon jam, red pepper flakes, and vinegar. Stir to combine. Add a tiny bit of water if it’s not the right consistency to coat the greens easily.

IMG_7290

Warm Bacon Jam Dressing. Yes, please!

Throw the greens in a bowl, toss with the dressing (do this only when your egg is done as the dressing is warm and will wilt the greens slightly). Pile on your pork, egg, and tomatoes. Salt and pepper to taste.

IMG_7292

Now go ‘Get Your Salad On’ for breakfast!

And just like that you have a ‘breakfast salad’ that will get you started on the right foot. Or hey, eat it for lunch or dinner. If Salad doesn’t mind switching to breakfast, I’m sure Bacon and Eggs don’t mind hanging out with your for dinner!

Brewing Kombucha-or, “What the Hell is that?!”

2
IMG_7285

Home-brewed kombucha. Part mystery, part tasty, part science.

Grumpy Kevin and I fell down the fermentation rabbit hole after our first batch of sauerkraut. Then came fermented beets, ginger, pickles, eggs, vinegar, and kimchi. And now we’ve arrived at Kombucha, or fermented sweet tea. On further contemplation it seems pretty logical to ferment sweet tea in the South. After all, have you seen some of the weird things we eat??

Now there’s a lot of hype, myth, and confusion about Kombucha. Some say it’s from Russia, others from China. There are claims that it will ‘cure what ails ya’ and others claim it can kill you. Generally when such extremes are shouted from the mountaintops, I do a little investigating prior to jumping in headlong. So, I scoured the interwebs, reviewed several books on fermentation (previously read), checked out any evidence in medical journals (none), talked to buddies that were already brewing it, and reviewed a write-up by the CDC. What I determined for myself is pretty much what I learned in my Anthropological studies-cultures have been doing these things ‘for-evah’ in conditions much less clean than most kitchens and yet the folks are still alive. Now, one tool in their arsenal that we generally don’t have is a massive cultural legacy handed down from one generation to another on how to do this. What does that mean? Proceed with caution, common sense, and moderation.

**Note: Kombucha is brewed in the presence of a SCOBY (Symbiotic Culture of Bacteria and Yeast). You can get these from friends (make sure you know their brewing practices) or order online from a reputable seller. These are live bacteria and yeast that must be cared for properly (no chemicals, no metal, etc.). For your safety and own knowledge I highly suggest doing some reading before you go down the Kombucha Road-no site contains all of the info in one place.**

Basic Kombucha Recipe

  • 1 SCOBY plus 2 cups of starter tea (or use unpasteurized, non-flavored store-bought kombucha)
  • 1 gallon filtered water
  • 1 cup white sugar (necessary; will be used up in fermentation)
  • 8 bags black tea (or 2 tablespoons loose tea)
  • Choice of fruit or other flavorings for a second fermentation
  • Large stockpot
  • 4-6 quart jars with lids
  • Butter muslin, tea towels, or other breathable cloth
  • Twine or large rubber band

Obtain a SCOBY. Ask your more ‘crunchy’ friends if they brew kombucha and ask if they have a SCOBY to spare. I got mine from my buddy, Jeff, after a conversation about the wonderful weirdness of fermenting.

IMG_7226

If you didn’t know better, you’d think SCOBYs were something out of a 1940s horror flick-not something you are actually trying to cultivate!

Make your tea. Make sure to use quality tea without pesticides or chemicals and no flavorings (think Earl Grey)-your SCOBY is a living thing and these will harm it. In a non-reactive stockpot, boil your water. Remove from heat and stir in the sugar until dissolved. Steep the tea for 15 minutes. Let the water cool completely (too warm of a temperature and you’ll end up killing your SCOBY). Remove the bags when cooled, or strain the loose tea. When completely cool, stir in the starter tea or store-bought kombucha. Cover with cloth (I use butter muslin) and secure cloth tightly with twine or a rubber band.

IMG_7227

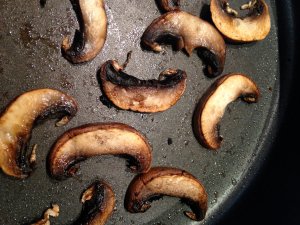
Kombucha in its element. An ‘adult’ or ‘mother’ kombucha SCOBY and baby SCOBY forming on top.

Wait. Let the weird, gelatinous, SCOBY-blob do its thing in a room temperature spot out of direct sunlight for 5 to 30 days. Yes, that’s quite a spread. Start tasting at 5 days (clean equipment only) and stop when the flavor seems right to you. Grumpy Kevin and I are quite a fan of tart, so we ferment for 21 days at a temperature of about 70ish. The result is definitely tart-like an apple cider vinegar. We then send it though a second ferment with fruit or other flavorings for 5 to 7 days. During your ferments, use common sense and watch for things like green or black mold (the acidic environment should prevent this). This is where your reading comes in since great granny isn’t giving out advice on kombucha brewing (at least not in the South).

Have some fun. Second Ferment…or ‘wait again’. Now you can have some fun with the flavor of your Kombucha. Use ginger, lemon, orange, berries, other flavored teas, or herbs for a “second ferment”. Gently remove your SCOBY (clean, vinegar-rinsed hands) and place it in a clean, vinegar-rinsed glass container. Don’t forget to save 2 cups of starter tea for your next batch. Place a bit of fruit (no science here-maybe a half of a cup) in the bottom of your clean quart jars and fill them with kombucha, leaving an inch or so at the top. Place your lids and set them out of direct sunlight on the counter. Wait 1-5 days for the carbonation to increase and flavors to develop, releasing the building CO2 daily. After the taste is to your liking, strain the kombucha into quart jars, place lids, and put in the fridge. They will last several weeks.

IMG_7231

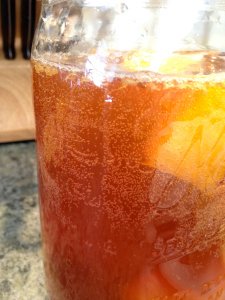
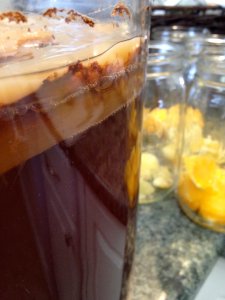
Carbonation from a second ferment.

Start up your next batch. Follow the instructions again from the beginning to keep yourself stocked in kombucha. Otherwise keep the scoby and starter tea in a sealed glass container in the fridge until ready. We continuously brew kombucha, so I’ve not had to ‘put the SCOBY to rest’ yet. There are plenty of sites with info for doing this though. If you’re super brave, you can try doing a second fermentation with sugars/fruit and/or other yeasts to purposefully increase the carbonation and alcohol content of your kombucha. I have not done this…but it sounds like a good experiment (i.e. watch for that at a later date!).

This Ain’t Your Gran’ Momma’s Kale

0
IMG_7020

Creamed kale with mushrooms, onions, and Asiago…you’ve never had it so good! This ain’t your Gran’ Momma’s kale!

Oh The Mighty Kale. Everyone’s lovin’ it. And it’s everywhere. And it’s not always so tasty. I can certainly understand why some folks scrunch up their noses, curl their upper lip, and proceed to lambaste the very existence of kale. I too can conjure up those images of piles of soggy, stinky, greenish-black (think Charleston Green) kale that my cooking forebearers served up. Yes, cooking kale can be a bit tricky but with a little practice you’ll be lovin’ it. This recipe is pretty darn quick and simple and can be eaten as a side dish or you can add a bit more cheese and cream and serve it over pasta. This also goes nicely with a grilled chicken breast or pork loin for those non-grain eaters. For you ‘rooter-to-tooter’ eaters, roast up some marrow bones and serve this on the side or on top of the bones. So come on now, close your eyes, take a big breath, and promise me you’ll give The Mighty Kale another try. I promise you won’t be sorry!

Creamed Kale with Sautéed Mushrooms, Onions, and Asiago

  • 1.5 pounds of kale (about 2 bunches), stems removed, blanched and drained
  • 1 pound mushrooms, sliced, cooked
  • 1/2 sweet onion, sliced
  • 3 TBSP butter (raw or cultured if you have it)
  • 2/3 cup heavy cream
  • 1/4 cup grated Asiago cheese
  • 1/8 tsp nutmeg (I’ve used allspice or mace in a pinch, but nutmeg is definitely the best choice)
  • Salt and pepper to taste
  • Optional: Bacon, jowl bacon, or lardons

Remove the center stems, roughly chop, blanch, and drain your kale. Cook your mushrooms to your liking (in a pan with a bit of room between each mushroom, flipping only once is ideal). If you’re using a bacon product, cook it over medium heat until crisp, letting the fat render, and remove it to a paper towel to drain. Try not to eat all of it. Save the fat to saute your onions. If you’re not a pig lover (*gasp*) just use a few teaspoons of your favorite oil (roasted walnut is a nice choice).

IMG_7008

Cut down either side of the center stem to remove it-then roughly chop your kale.

IMG_7010

Blanch your kale—seriously, it looks (and tastes) so much more edible after blanching!

IMG_7013

Cook up your mushrooms…

Continuing over a medium heat, saute your onions in your choice of fat until translucent and tender.

IMG_7016

Let your onions become translucent.

Add your nutmeg to ‘bloom’ (big ol’ fancy talk for letting it heat a bit, allowing the aromatic oils to release). Cook the nutmeg over medium heat, stirring, for about 30 seconds or so. Heap in your kale. Add the cream and cheese, stirring to coat. Cook until the cream has thickened, the cheese had incorporated, and your kale is tender. This should take about 5 minutes or so. The kale should still be a bit ‘toothy’, or have some body to it. Cook it a bit more if you’d like, but don’t overcook it or you’ll have a bitter mess! Add the mushrooms, and the porky bits if you’re using them, and toss gently to mix them in with the kale and cream sauce.

IMG_7018

Startin’ to look tasty!

Now go to town! Pair it up with your favorite meat (beef, pork, and duck work very well). Or maybe you’ll like it with those marrow bones or over toast points with an over-easy fried egg. Or-oh my gosh-with a ooey gooey grilled cheese sandwich! Now, go run call your Gran’ Momma and tell her you actually do love kale…as for me, I’m off to hunt down that ooey gooey grilled cheese to make friendly with my kale!

IMG_7020

What?! And you thought you didn’t like kale??

Perfect Mushrooms

2

Yes, yes, I know. Why is there a post on making the perfect mushroom? Same reason there’s a post on blanching vegetables. Ya can’t build a house without any bricks now can ya? Proper blanching and making the perfect mushroom are your bricks. Trust me, once you eat a mushroom prepared this way you’ll have a hard time going back to those watery, limp ones.

The first key is to have dry mushrooms, so don’t wash them right before you’re going to cook them. It’s much like trying to sear meat. That beautiful brown ‘crust’ forms when the surface coming into contact with the pan is dry (I could go into some long chemistry chitty chat about what’s happening there, but I suspect you don’t care as long as the mushroom turns out delicious). The second key to a perfect mushroom is to have a wide bottomed pan. The mushrooms don’t like to be crowded. You need a single layer with a little room in between each mushroom. Otherwise, the ‘shrooms end up steaming themselves and their neighbors. Next up? Enough heat to draw moisture out of the mushroom and evaporate it as you cook them. This translates to a medium heat on my stove top. Lastly, use good butter. Sure, you can use olive oil or any other heat tolerant oil, but you should at least try butter. I marvel at how a pat of butter can transform the lowly fungi every time I make these. Oh-and cook some extra ’cause you’re gonna eat ’em as you go!

  • Mushrooms, any kind, sliced
  • Oil of your preference…say yes to butter! Start out with a couple of teaspoons and replenish as necessary if you are cooking up multiple pan batches.
  • Pan large enough to allow space between each mushroom in a single layer; Cook in multiple batches if necessary; Non-stick or a well-seasoned cast iron pan works best.
IMG_7011

Start out with dry mushrooms. I prefer mine sliced 1/4 to 1/2 inch thick.

Place the pan over medium heat and add pat of butter. Bring butter up to temp (watch for the foam to subside) and add mushrooms in a single layer with a little bit of space in between each one. Now wait. Practice your patience. You should hear the mushrooms sizzling the whole time. After several minutes the mushrooms will begin to release a little moisture in the form of amber beads of ‘mushroom sweat’ on their topsides.

IMG_7013

See those little beads of amber liquid starting to form? That’s what you’re looking for—that means you’re concentrating the flavor! Just about time to flip!

IMG_6666

Here’s another pic of the ‘mushroom sweat’…these guys are definitely ready to flip.

After each mushroom has offered up some little amber sweat beads, gently flip them. You’ll find the side that has been in contact with the pan is a beautiful caramel color. This translates to super flavor. You should be getting excited at this point and you might start trying to pick one out of the hot pan since they smell soooo goood.

IMG_7015

Hey now…look at that golden caramel color around the edges. That’s what you’re looking for. Let ’em wilt a minute or two and pull them off of the heat. Err on less cooking than more.

Cook them for a few minutes more until they just start to ‘wilt’ and look a bit darker brown (see below). You want them to retain some firmness and not to get dried out. Err on the side of too short a cooking time versus too long. They will wilt a bit more once off of the heat. You’re looking at about a 8-10 minute total time. Salt if necessary.

IMG_6670

Look at those beauties. Best ‘mushroomy’ mushroom you can get! And a great texture to boot. Dig in!

Now run forth and make Perfect Mushrooms for everyone you know. Watch as their faces light up with amazement that they’ve never had a mushroom that tasted so good. And for reals…try them with light puffy scrambled eggs and a bit o’ shredded cheese…eggs never met a better partner!

**If you’re adding these to a dish it’s best to cook them separately and then add in at an appropriate time so they retain both flavor and texture (i.e. close to the end).**

Blanching Greens

5

Okay. This topic might sound a bit simple, or unnecessary. BUT I’ve found lots of folks who don’t know how or why you should blanch greens. If you’re no stranger to greens, you know they can be bitter and pungent. Blanching often reduces this bitterness. Don’t believe me? Peel some outer leaves off of brussel sprouts, blanch quickly, shock in ice, and serve with a citrus vinaigrette. You’ve just made a sweet, tasty salad out of one of the most despised vegetables. No bitterness or funk to be found. Blanching can also reduce cooking times. Thinking about adding greens to a pasta dish? It’ll be faster, and tastier if they’re blanched. Blanching also lets you add greens to other dishes-like a quiche. If you didn’t blanch them and squeeze out the liquid first you’d have egg, greens, and cheese soup! If none of this convinces you of the merits of blanching…let’s go with ‘it just makes the colors so darn pretty’.

Now that we’ve learned the merits of blanching, don’t stop at greens. Blanching other vegetables can work in your favor too. Blanched green beans turn out sweet but still crunchy and are perfect for a Salad Nicoise (or a snack!). Blanch a tomato to help the skin slip off. Blanch tiny baby carrots to make them even sweeter while retaining some firmness. Or blanch fresh corn or field peas prior to freezing in order to retain freshness (it kills natural bacteria on the skin that can produce off tastes later).

  • Prepare an ice bath by filling a bowl with both ice and water. Nest your sieve or colander down in the bowl and set it aside (the nesting makes it easier to strain away the water).
  • Fill a large pot with salted water and bring to a boil. As Chef Thomas Keller states, “It should taste like sea water in the summer”.
  • Working in small batches, gently place your greens (or other veggies) in the boiling water. Be careful to maintain a boil throughout. The idea is to cook the veggies as quickly as possible. Small batches and a high salt content help keep the water boiling so the veggies cook as quickly as possible.
  • Watch for the color to ‘pop’. Don’t worry, you’ll see it. The veggies will get much brighter. Now, if you’re still wanting a crunch to them, pull them out with a slotted spoon or skimmer. If you’d like, you can cook them until your preferred firmness. If you like a super squishy vegetable (I hope not!), there are probably better methods of cooking them so there’s more flavor. Too long in the pot and you’re just boiling the veggies. They will look sad and depressing and taste like, well, water. We all know from our school cafeteria days what a boiled veggie looks like! No. Thank. You.
  • Plunge them into the ice bath and cool completely to stop the cooking. You can season and eat as is or you can saute, roast, or add them to other preparations. Go wild!

Next time you’re cooking up some fresh veggies, give blanching a go. You might just find you like those brussel sprouts after all!

Check out these unblanched greens…

IMG_7008

Unblanched kale. Lovely, but a little dull.

Now, check out the same kale after blanching…

IMG_7010

Gorgeous! And super tasty…no bitterness to be found!