Who needs Crackers and Chips…I’ve got Cabbage!

0
Cabbage chips

Need a little chip for your work week (or any other time) snack? Try cabbage chips! They’re big enough to hold some serious eats and let you snack until your heart’s content with no guilt. Beach season here I come!

‘Tis the season of sweat. The more your parts aren’t sticking together, the better. Am I right? Much like the rest of the country, I’m always looking for ways to reduce my habitus. Cutting back on carbs always seems to work wonders. But what’s a girl to snack on during movie time? Or who’s gonna help you with your hummus, guacamole, or olive tapenade during lunch time? Cabbage, that’s who. Wait, what? Are you suddenly conjuring ideas of digging into a steamy bowl of braised cabbage while renting 50 Shades of Grey? Flashes of guacamole atop your pile of shredded cabbage? Probably. But that’s not what I mean.

So, undoubtedly you’ve heard of the A-lister favorite, kale chips. Yes, they are good, but they’re a bit like seaweed, get soft fast, and there’s no putting any kind of dip on a kale chip. You could make up some cauliflower crackers, but they do indeed taste a bit like cauliflower (amazing, I know). So, in my hunt for something with a least a little crunch, no grains, fairly flavor-neutral, and big enough to put some dip on…I found cabbage. Much like using collards in place of bread or wraps, using cabbage in place of chips or crackers wipes out grain consumption and reduces carbs and calories.

Trust me, try these and they’ll be a new tool in your fight for wearing your favorite thong bikini!

Cabbage Chips

  • 1 head of cabbage (use regular or savoy), separated into leaves, stems removed
  • Salty water for blanching
  • Ice bath
  • Paper towels
  • Salt and pepper to taste
  • Dehydrator

Gently peel the leaves of cabbage away from head, keeping the leaves intact. Remove stems and blanch. Plunge leaves into ice bath. Drain and pat dry with paper towels (or tea towels to reduce waste). Cut leaves into desired size (for crackers I usually split larger leaves down the middle and keep smaller leaves intact). Place the leaves in a single layers in your dehydrator and season them to taste with salt and pepper.

cabbage chips

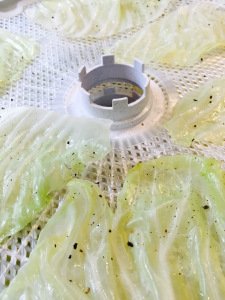
Cabbage leaves ready for dehydration. Three hours until crunchy goodness.

Dehydrate according to your model’s directions until the leaves are crisp. Mine took 3 hours at 135 degrees. Let the chip-crackers cool completely. To keep them crisp all week, place them in a large Ziploc bag with a desiccant pack and store in the fridge. Feel free to snack away-that thong bikini will still fit!
cabbage chips

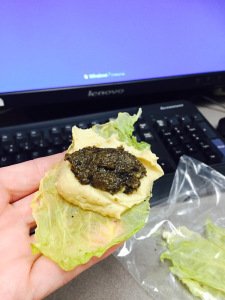
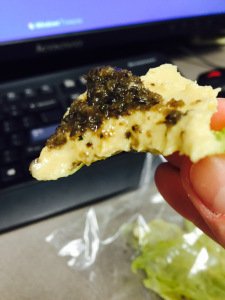
These chips hold up. Although they’re difficult to dig into dip with, they’re perfect for smothering in guacamole, salsa, hummus, tapenade, or otherwise. They’ll bend a little, but won’t crumble like kale chips. They’re the perfect go to instead of crackers or pita bread points.

Ferment Nation: It’s Sauerkraut Time!

3

Summer’s winding down and the first hints of cooler weather are in the air. That means I’m getting antsy to stew and braise and make big, bubbling pots of goodness that fill the house with their savory aroma all day long. Unfortunately it’s only slightly less hot than the Hinges of Hell here, which is not quite cool enough for standing next to a steamy meat cauldron all day. What does one do then, to prepare for fall cooking? Ferment. That’s what.

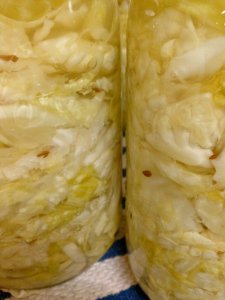
With just a little bit of prep and a whole lot of waiting, barely chewable raw cabbage is turned into that salty, sour delight we call sauerkraut. Setting out jars on the counter now will allow for braised pork steaks with sauerkraut, apples, and onions in about a month. Or a mound of sauerkraut, boiled potatoes, kielbasa sausage, and a little German mustard. Or pork belly (or braised ham hock or pork neck) and sauerkraut mashed potatoes. It also goes well on a sharp cheddar cheese grilled sandwich. So much sauerkraut, so little time!

Here we go (for 3 16 ounce jars):

  • 3 sterilized, quart-sized, wide mouth canning jars
  • 1 wooden spoon
  • 2 medium heads of cabbage
  • quality sea salt
  • Caraway seeds to taste (I used about 1 tsp)
  • Juniper berries to taste (I used about 2 tsp)
  • Coconut oil, about 6 TBSP, gently melted (olive oil may be substituted)
  • Sterilize canning jars by submerging in boiling water for 10 minutes. Or, cheat like I do and put them in the bottom of the dishwasher and run the sanitize cycle.
  • Thoroughly clean cabbage. Remove about 3-4 outer leaves from each head of cabbage.
  • Fill a pot large enough to fit one outer leaf of cabbage at a time half way with water and bring to a boil. Once boiling, blanch each outer cabbage leaf for a minute or two or until soft enough to manipulate without tearing. These will serve to hold the shredded bits of cabbage under the brine. Set blanched leaves aside. Discard water.
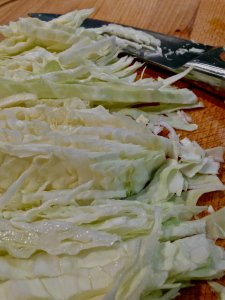
  • Finely shred each head of cabbage using a cabbage shredder, mandolin, food processor, or chef’s knife. I really do seem to like the rustic feel when done by hand—big pieces, little pieces, and varying textures.
IMG_5360

A sharp knife makes easy work of hand-shredding cabbage

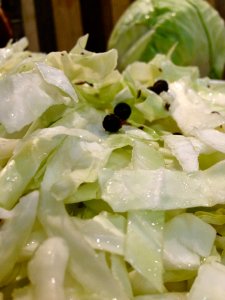
  • Sprinkle about 1/2 teaspoon of salt in the bottom of a large bowl. Place a layer of shredded cabbage on top of the salt. Sprinkle that layer with salt, caraway seeds, and juniper berries and add another layer of cabbage. Continue until all of the cabbage is layered with salt, caraway seeds, and juniper berries. Mix thoroughly with very clean hands. Press firmly with the wooden spoon to encourage the cabbage to release more liquid (or squeeze firmly with those very clean hands). Allow to sit for one hour. The salt will continue to draw liquid out of the cabbage to form a brine. Do not discard this liquid as it will serve to cover the cabbage and create an oxygen-deprived state for the microorganisms to do their job.
IMG_5362

You can start to see little beads of water forming on the cabbage: This is your cabbagy brine starting to form.

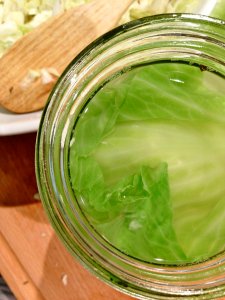
  • After the cabbage has wilted for an hour, stuff into sterilized quart jars and pack tightly (do so every few handfuls and the task is easier). After all jars are packed, tuck a blanched cabbage leaf or two over the top of the shredded cabbage. Now pour the remaining brine over the cabbage in the jars equally. If there is not enough brine to cover, add more brine made of 1 tsp. sea salt to 1 cup of non-chlorinated water (I use filtered). Make sure no cabbage is peeking above the brine level. If it is, it will serve to encourage undesirable yeasts and molds.
IMG_5374

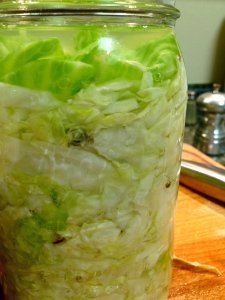
cabbage packed neatly into the jar and covered in brine (I’ll take care of that little piece trying to escape a bit later)

IMG_5373

The blanched whole cabbage leaves work to hold all the bits and shredded cabbage under the brine

  • Cover each jar with two layers of cheesecloth or butter muslin and tie with kitchen twine.
  • Place the jars in a warm spot (I’ve read everything from 68-73 degrees; my house stays an even 72 in summer and fall here in the South) on a rimmed baking sheet lined with a kitchen towel. The mixture may produce more brine over the next day or two and spill over (hence the tray and towel).
  • When the jars stop producing more liquid (1-3 days depending on temperature), I make sure everything is tucked in and cap with coconut oil by gently melting enough coconut oil to form a 1/4 inch layer on top of each jar’s brine. Over several hours the coconut oil will harden and form a close-fitting cap. It is easily removed later and I can easily ‘smell the progress’ through the cap. I’ve also used a layer of olive oil (it can be mixed in prior to eating).
IMG_5422

Note how the color changed from bright green to yellow and slightly translucent-this is normal

  • Sit back and enjoy the show for the next 3-4 weeks (mine usually seems to hit the spot at about 2.5 weeks with the house at 72).
  • Do watch for mold, browned cabbage, pink cabbage, or fuzz. This indicates you need to throw it away. Apparently a bit of white sludge in the bottom or on top is normal. Mine have never produced that, so I can’t say how it affects taste.
  • When it reaches the desired taste and texture (anywhere from 1 week to 6 weeks or longer), make sure all parts are still covered in brine, remove the coconut oil cover, put a lid on the jar, and place it in the fridge. It will keep for months (if you can keep it around that long!).

I don’t know if I’ll ever learn all there is to know about fermentation. It’s part science, part art, part instinct. If you’re brave, read up on the internet posts and get going-that’s how I started. Looking back, I’d have done a little more reading first. That being said, two great resources I now own and highly recommend are Wild Fermentation: The Flavor, Nutrition, and Craft of Live-Culture Foods (found here https://www.wildfermentation.com/wild-fermentation/) and The Art of Fermentation (found here https://www.wildfermentation.com/the-art-of-fermentation/).