Shanghai Red Cooked Pork Belly

2

I first fell in love with Chinese red cooking when I adapted a red cooked beef finger recipe. It was truly addicting. So much so that I ran, nay sprinted, many blocks, in flood water rains to procure the necessary items to make steamed bao buns. During the treacherous drive home, my mind had a stroke of genius…if red cooking made beef that tasted like a magical gift from the heavens, what would it do for my dear and longtime friend, Mr. Pork Belly. If the fatty beef fingers were delectable in the deeply satisfying red-cooked sauce, I knew beyond a shadow of a doubt that Mr. Pork Belly would be absolutely divine. So, I sprinted again, through monsoon rains to our local Asian market for a couple of pounds of pork belly…and a cup of hot tea, a bowl of beef Pho, and a cruise around the store to pick up $100 bucks or so of stuff I absolutely needed (quail eggs, new chopsticks, wuyi oolong tea, sake, rice seasoning, etc.).

Like the beef recipe, most pork belly recipes called for blanching the meat prior to braising. Like the recipe for Chinese Red-cooked Beef, I opted to sear the meat to add to the depth of the final dish. I also wanted a bit of the ‘bark’ or crispier edges that searing provides. Again, bao buns were on my mind. Soft pillowy clouds wrapped around crispy, sticky, sweet and salty pork nuggets, all laced with spicy Kimchi. Yes. Please.

The ingredients are identical to my Chinese Red-cooked Beef recipe, but pork belly brings a whole new level of business to the game. Add Kimchi and you are all up in it. All I can say is ‘no leftovers’. What? Yep. No leftovers. I shouldn’t admit it, but we (proudly) took down 2, count them, 2 pounds of pork belly. It took a whole day, but we indeed did it (and made sure a hefty workout was on the books for the next day!). This stuff is like meat candy. You’re gonna want to get on this. Pronto.

Shanghai Pork Belly

  • 2 pounds of pork belly, skin on, in 1.5 to 2 inch cubes
  • 1/2 cup sugar
  • 1/4 cup water
  • 1 and 1/2 cups dry sherry
  • 1/2 cup low sodium soy sauce or liquid aminos
  • 1 tsp white pepper
  • 1/2 tsp dried orange peel (you can substitute fresh zest if necessary)
  • 3 whole star anise
  • 1/2 tsp cinnamon
  • 2 red chilies, diced (or 1/4 tsp crushed red pepper flakes)
  • 2 tsp grated ginger
  • 1 garlic clove
  • 1.5 cups water or pork or vegetable broth (no or low sodium); as much as needed for appropriate liquid level

Caramelize your sugar and make the Sherry-sugar sauce just like in the Chinese Red-cooked Beef recipe. Next, brown those little nuggets of goodness, or pork belly cubes if you prefer to call them that (*frowns*). Remember, dry your pork nuggets thoroughly, make sure your oil is well heated, allow plenty of room between the nuggets, and allow the pan to come back to temp between batches. Remove the nuggets and set aside on a plate.

IMG_2270

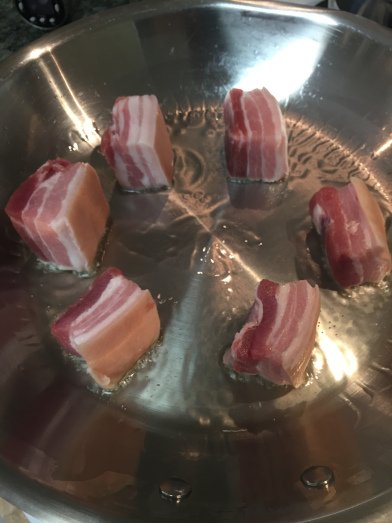
Remember to dry the pork thoroughly, heat your oil well, and leave enough room between pieces so they don’t steam instead of sear.

IMG_2275 2

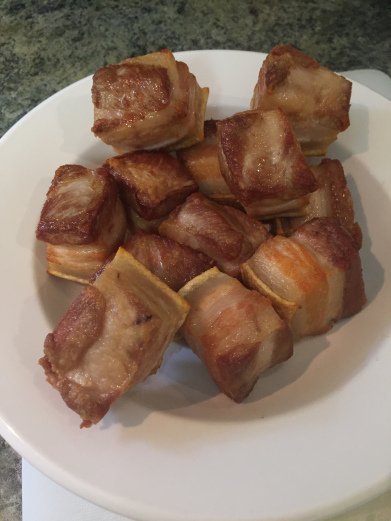
Golden pork nuggets!

Drain most of the fat from pan. I know, I know. I usually display exaggerated disapproving facial expressions at those committing the crime of ‘fat draining’, but sometimes there are exceptions. More fat will render during cooking and all will be well. Trust me. Now, reduce your heat to medium-low, add your dry spices to the pan, and heat them for about 1 minute. This allows the oils in the warmer spices to bloom. Add your red pepper flakes here if you’re not using fresh chilies. Next, add the soy sauce or liquid aminos. Add the ginger, garlic, and peppers. Deglaze the pan by scraping the bottom with the edge of a wooden spoon. Once all the good bits are worked free from the bottom of the pan add the sugar-sherry mixture. Return your pork nuggets to the pan, placing them in evenly in one layer.

IMG_2276

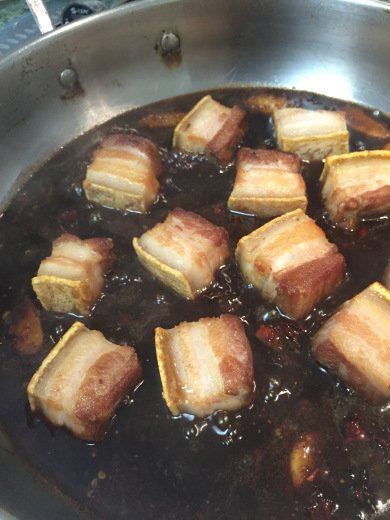
Check out the beautiful mahogany-colored sauce. The scent of star anise, orange, cinnamon, and ginger will fill the house. Commence drooling.

The sugar-sherry liquid level should come up to about 1/2 the level of the top of the meat (we want to braise the meat, not stew it). Add water, pork stock, or chicken stock if needed to achieve the appropriate liquid level. If you add stock, be sure it is no- or low-sodium as there is plenty of salt to be had otherwise. Bring the pork and liquid mixture to a simmer, place the lid, and tuck it away in your preheated oven. Cook until the meat is fork tender and the fat and connective tissue is dissolved, about 2-3 hours.

Remove the pork from the pan to a plate. Try really hard not to eat it right away. You will need to exercise extreme discipline at this point or perhaps try physical restraint. I am not ashamed to admit I failed (and earned a blister on the roof of my mouth to prove it!). Remove your star anise from the pan liquid and boil the sauce until it is glossy and reduced to about a cup.
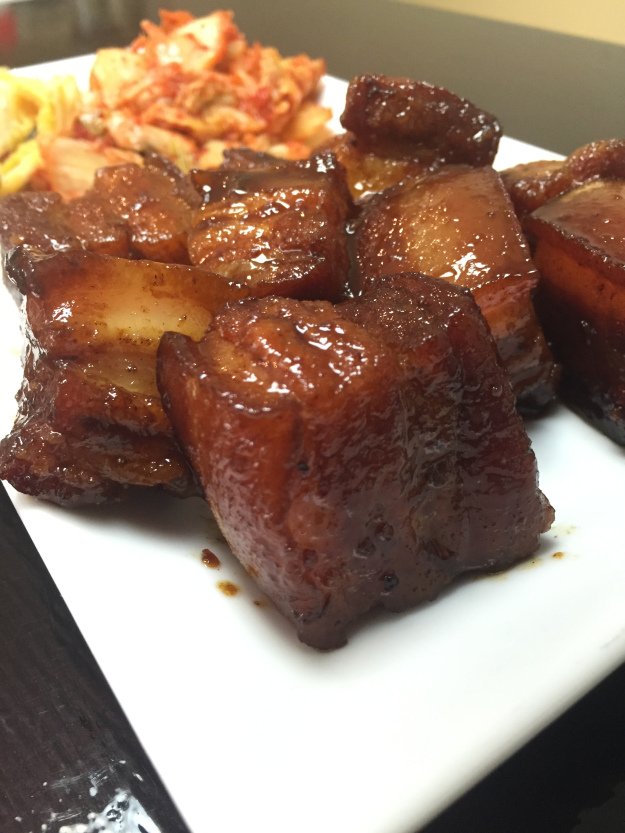
IMG_2280

Look. At. That.

Serve meat, drizzled with sauce, over rice or with your favorite steamed or sauteed vegetable. My preference is sticky, salty, sweet pork nuggets tucked into airy Bao Buns, nestled alongside spicy and sour Kimchi, and paired with lightly wilted bok choy. None better. Broccoli, broccoli rabe, bok choy, kale, or spinach pair well too. Enjoy!

IMG_2279

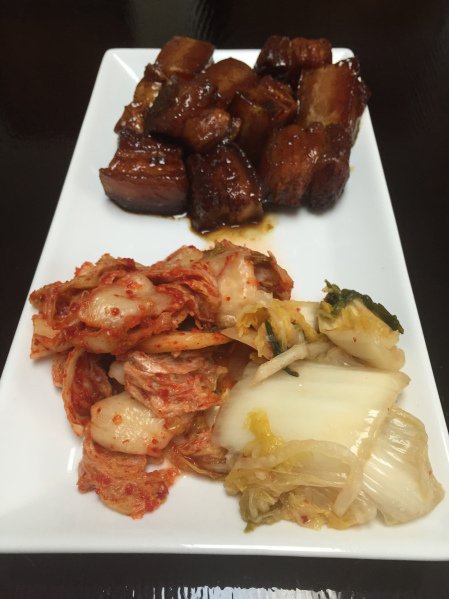
Kimchi is the perfect partner.

IMG_2282

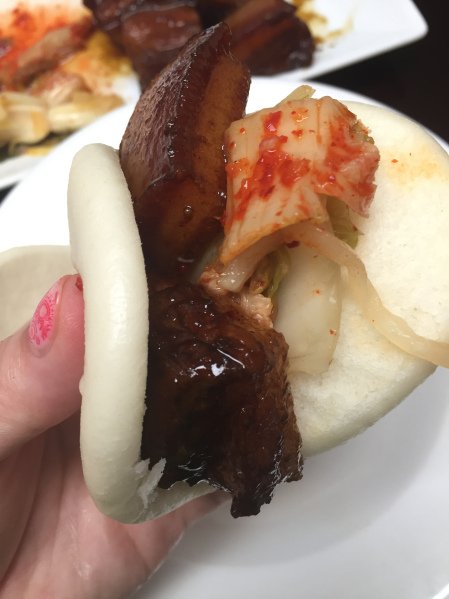
Eat it up. Shanghai pork and kimchi ride along perfectly in little puffy bao buns.


Chinese Red Cooked Beef

1

Home-cooked Chinese food is typically not ‘my thing’. I’ve just never really taken the time to learn the techniques or accumulate the tools. It might also have to do with a few of my Mom’s failed attempts at Chinese cooking back in the 70’s (Public Service announcement: By no means should Betty Crocker or Redbook recipes be your guide to Chinese cooking!). And then I read a recipe for Chinese Red-cooked Beef. Truth be told, I practically slobbered all over the cookbook. For those that don’t know (I didn’t), Chinese Red Cooking is a soy sauce-based braising method, more properly called hongshao and popular in Shaghai, which imparts a dark red-brown color to beef and the sauce. Soy sauce, bean paste, rice wine or sherry, and/or caramelized sugar work to impart the red coloring and provide a deep savory flavor. Warm spices like star anise, cinnamon, and ginger give incredible flavor. Think of it as another version of your favorite slow-cooked stew sans veggies. Jack. Pot.

Due to the ‘low and slow’ cooking method, fatty cuts with a lot of connective tissue work best. Your mind should skip to rib meat (commonly called ‘beef fingers’) or short ribs. Don’t forget about your friend pork belly either. All you need is a bit of patience and some time and you’re good to go. There are no crazy techniques or super specialized equipment. Simple gets the job done here.

Instead of blanching the beef in boiling water like most recipes, I opted to sear the beef to add more meaty goodness and depth of flavor. Call me crazy, but the browned beef bits make a difference in the end result. Also, don’t skip the caramelized sugar part-it adds depth too!

Chinese Red Cooked Beef

  • 2 pounds of beef fingers
  • 1/2 cup sugar
  • 1/4 cup water
  • 1 and 1/2 cups dry sherry
  • 1/2 cup low sodium soy sauce or liquid aminos
  • 1 tsp white pepper
  • 1/2 tsp dried orange peel (you can substitute fresh zest if necessary)
  • 3 whole star anise
  • 1/2 tsp cinnamon
  • 2 red chiles, diced (or 1/4 tsp crushed red pepper flakes)
  • 2 tsp grated ginger
  • 1 garlic clove
  • 1.5 cups water or beef broth (low or no sodium); as much as needed for appropriate liquid level

Combine sugar and water in a saucepan over medium heat. Stir to dissolve. Continue to cook on medium heat, watching carefully, until golden brown. If the sugar crystallizes at the edge, push it back into the liquid with a wet pastry brush. Once sugar is caramelized, remove the pan from the heat, wait about 1 minute, and add the Sherry. Stir to dissolve the sugar. Remove from the heat and set aside.

Shanghai Beef

Just starting in the carmelized sugar process. Don’t skip this step! It adds depth of flavor.

Chinese Red Beef

The water has been added and the sugar is a handful of minutes into cooking. Notice the faint golden color. Watch very closely as the sugar can go from caramelized to burned in seconds.

Red braised beef

The color is a bit darker, but we’re not done just yet!

Shanghai beef

There we go! Nice dark color but not burnt. Burning the sugar will give you bitterness instead of deep flavor.

Preheat the oven to 325 degrees. Completely dry beef with paper towels or bar towel.

braised red beef

Just like any other time you sear meat, dry thoroughly. Too much juice on the surface leads to the meat steaming at the surface instead of undergoing the Maillard reaction which gives the nicely browned surface. You want that browned crust to build layers of flavor.

Heat high-heat oil (beef tallow works best) in a pan until almost smoking. Place beef with a bit of room between each piece (crowding the pan begets steaming the beef, not searing), and sear the beef until well browned on all sides. Remove the beef from the pan to a plate.

braised beef

Sear your beef. Be patient. When the beef forms a good crust, you’ll be able to turn it without it sticking to the pan. The key is to dry the meat and have a well-heated oil. Don’t crowd the pan and allow the pan to return to temp between batches.

Drain fat from pan. I know I usually hold high disdain for those ‘fat-drainers’ out there, but trust me on this one, you’ll make more fat during cooking. Reduce heat to medium low. Add dry spices to the pan and heat for about 1 minute. Add your red pepper flakes here if you’re not using fresh chilies. Add the soy sauce or liquid aminos. Add the ginger, garlic, and peppers. Deglaze the pan by scraping the bottom with the edge of a wooden spoon. Once all the good bits are worked free from the bottom of the pan add the sugar-Sherry mixture. Return the beef to the pan, placing it evenly in one layer.

Chinese beef

Add the beef to the super flavorful sauce. Practice patience. Or maybe tie yourself up Houdini-style. It’s going to be hard to resist the aromas emanating from the kitchen!

The liquid level should come up to about 1/2 the level of the top of the meat. Add water or low sodium beef broth if needed to achieve the appropriate liquid level. Bring the beef and liquid mixture to a simmer, place the lid, and tuck it away in your preheated oven. Cook until the meat is fork tender and the fat and connective tissue is dissolved, about 3 hours.

Chinese Red Briased Beef

If I didn’t learn from past mistakes (i.e. blistered and/or skinless mouth), I’d dig right in straight from the pan. This stuff smells righteous!

Remove the meat from the pan to a plate.Remove star anise from the pan liquid. Boil the sauce until it is glossy and reduced to about a cup. Chop or break meat into chunks.

Chinese Beef

You. Have. No. Idea.

Serve meat, drizzled with sauce, over rice or with your favorite steamed or sauteed vegetable. We love to pair it with Bao Buns picked up from a local Asian market, Kimchi, and wilted bok choy. Other veggies such as broccoli, broccoli rabe, bok choy, kale, or spinach pair well too. I’m not ashamed to admit this deliciousness never makes it to the table..strictly a stand around the kitchen table, getting jiggy with the beef-bao bun combo, and rolling eyes in delight. Enjoy!

Chinese red-cooked beef

Dig in! Kimchi, bokchoy, and bao buns make delightful additions!

Peruvian Charcoal Chicken - Pollo al la Brasa

0

Take a look at the meat counters and it’s obvious everyone is bellying up to pork and beef. Hey, it’s not that I don’t love me some pork and beef, but apparently I’m a poor planner and the whole cut selections are a bit pitiful. There were some preformed hamburgers and hotdogs left, but there was no way in Hades that was happening. It seems reading Upton Sinclair’s ‘The Jungle’ in sixth grade swore me off of the majority of preformed meats for the duration of my life. In fact, I’ve been sans hot dogs since I was 9 years old (*gags*). I tried to be brave and eat a hot dog piled up with mayo, mustard, ketchup, chili, cheese, and onions while on one of the first dates with The Hubbs (hey, I didn’t want him to think I was cray-cray that early on!). After the first bite I scraped the toppings over the end so I couldn’t see it. After the second bite my cover was blown and The Hubbs saved the day by finishing it up (I redeemed myself by taking the gold in Putt Putt). I will indulge in quality sausages since the ‘taste-to-risk ratio’ is better but only one bedraggled package of decent looking sausages remained at the meat counter.

Time to turn to chicken. As many who know me are aware, I’m generally not a fan of eating chicken at home. It seems you need planning (argh! Nemesis!), brining, sauces, and/or a handful of accouterments to pull off tasty chicken. And then it’s not, well, pork. Then there’s the fun of hanging out on the porch while cooking pork and beef, Hubbs and doggies in tow, and music wafting. That dream lends itself to buddying up to the grill and smoker. The smoker loves pork and beef.

Well folks, I am determined. I will make friends with my porch this day. I will have tasty food. Dang it Chicken, you will rue the day you challenged me (*looks skyward, shaking fist*)!

Ahem. Now. What to do with this chiiickkeen (*says dramatically, half scowling*)? We’re going with a whole chicken because, well, I had one in the freezer. On to how we’re going to treat it. Plain ol’ grilled chicken is boring. BBQ chicken is reserved for Dad. I’ll never top his, so why try? Oven baked or roasted? The idea of cranking up the oven in my little bitty house is unfathomable in summer. There’s Tandoori Chicken or Japanese Yakitori Chicken. But alas, I have yet to convince Grumpy Kevin (aka The Hubbs) to build a Tandoori Oven in the backyard and I am sans Yakitori grill. Enter Pollo a la Brasa.

Pollo a la Brasa is a Peruvian spit-roasted chicken that sprung up in the 1950s and was once reserved for the wealthy. It now stars as a street food (I can hear the uttered words ‘street food’ or ‘food truck’ like my dog can hear a cheese wrapper from 50 miles away!). I love some street food! The flavors are pretty simple: lime, garlic, cumin, salt, garlic, ginger, pepper, and oregano. What we did have to do was figure out how to get spit-roasted quality while hanging out on the back porch. Like the Tandoori Oven and the Yakitori grill, I’ve tried to get the Hubbs to build a spit in the backyard, but I haven’t worn him down yet. He hasn’t agreed to keeping chickens or a goat either. I can’t fathom why!

I figured the best way to capture that spit-roasted flavor (crispy skin, little burnt edges, slight smoky flavor, and super juicy meat) is to brine the chicken for about an hour, use indirect heat, add a few wood chips, and turn the chicken frequently enough to promote even cooking. Don’t worry, I’m not giving up on having a spit situation on the back forty, but this should do in a pinch. Don’t fret, I’m not giving up on the Tandoori, Yakitori, yard birds, or goat. I just need time. Sweet, sweet time.

We wanted the meat to remain juicy, so we brined the bird for about an hour. We also wanted the ease of a spice rub (versus a marinade), so I used dehydrated lime and lemon instead of juices. If you don’t have these (you should!), you can substitute 2 TBSP fresh lime juice and 1 TBSP fresh lemon juice. Your spice rub will just be a bit more runny and more like a marinade.

This also works extremely well with chicken thighs and chicken breasts-just don’t brine those bits and decrease your cooking time.

  • Whole chicken, about 5 pounds
  • Standard Brine (1 cup of Kosher salt dissolved in 2 quarts of cool water)
  • 2 TBSP high heat oil
  • 3 TBSP cumin
  • 2 TBSP oregano
  • 5 garlic cloves
  • 1 tsp black pepper corns
  • 1 TBSP grated ginger
  • 6 slices dehydrated lime flesh (use about 2 TBSP fresh lime juice if you don’t have dried lime slices)
  • 3 slices dehydrated lemon flesh (use 1 TBSP fresh lemon juice if you don’t have dried lemon slices)
  • 2 TBSP soy sauce or liquid aminos

Brine your yard bird for an hour. Meanwhile combine all of the rub ingredients in processor and pulse until well combined and the pepper corns are broken up. Set aside.

Peruvian Charcoal Chicken

Spices are all ready for making the ‘rub’. I dehydrate my own lemon and lime slices, but you can find them online.

Peruvian Chicken

Tasty Pasty…chock full o’ flavor.

Remove the bird from the brine, rinse and pat dry. Spread the rub all over the chicken, including under the skin. Truss your bird for even cooking. This may be a test of your marriage. Breath and practice your Zen. For you dudes: Do not tell your wife how to truss a bird. You may end up with a face full of chicken juice/Peruvian rub. Just sayin’…I warned ya. Let the bird sit as long as possible with the rub (overnight, covered, in the fridge is best but you an get away with a couple of hours). Remove chicken from the fridge 1 hour prior to cooking to allow meat to come to room temperature.

Prepare your charcoal or gas grill. We opted for charcoal prepared with 4 quarts of offset charcoal briquettes. To do this, once the briquettes have been alight long enough to get a fairly even coating of white ash in your chimney starter, place even amounts in piles on either side of the grill. If you don’t know how to use a charcoal starter, check this out. We use a 22″ Weber grill ’cause my brother’s family is frickin’ awesome and gave me a whole get up for my 40th birthday camping trip. Best. Gift. Ever. I digress. A drip pan should be placed in between the charcoal piles. The bottom grill vent should be opened halfway. Feel free to add a couple of pre-soaked wood chunks or a handful of woodchips for a slightly smoky flavor. We prefer apple, cherry, or pecan wood for most purposes. Place the grill rack and the grill lid to heat the grill. After the grill is hot, remove the lid and clean and oil the grill rack.

Peruvian Charcoal Chicken

Grill set-up. Do not be afraid of the grill. If you’re looking for a great present for a cooking family member, this is it! Big kudos to ma bro for hookin’ me up!

Position your bird breast side down in the middle of the grill rack over the drip pan. Fat from the dark meat renders and runs downward, keeping the breasts from drying out.

Peruvian Chicken

Little birdy all ready to go!

Cover the grill with the grill lid vents open halfway and positioned as close to directly over the bird as possible. Grill about 30 minutes.

Remove the lid and flip the bird using kitchen towels, wadded up paper towels, or silicon gloves. We finally purchased heat resistant grilling gloves and it makes things so much easier. Definitely consider purchasing some if you are in the habit of grilling large cuts of meat or whole fowl. Your fingertips will thank you.

Charcoal Chicken

Lookin’ good. Grab your margarita and sit back. You’ve got about 30 minutes to go.

Replace the lid and grill about 30 minutes more until the bird registers 165 in the thigh with the temp probe not touching the bone.

Peruvian Chicken

Slobbering. Period. The smell coming off of this thing is ahh-maaaz-ing.

Remove the bird from the grill, place on a cutting board and tent with aluminum foil to rest for 10 minutes or so. This lets juices redistribute. Don’t skip it or your juice will end up on your cutting board.

Peruvian Charcoal Chicken

Damn fine Peruvian Yardbird if I do say so myself. Waiting for the resting period is the hardest part. No one wants to stoop to tearing it apart like rabid dogs over the cutting board. Exercise patience. You. Can. Do. It.

Cut your bird to your liking and serve with grilled green onions, Mexican Street Corn, sliced tomato, and guacamole. Serve with lime wedges for a little extra zest!

Peruvian Charcoal Chicken

Get your eat on. Street corn and guacamole serve up nice. Lime wedges give a little zest. Again, you folks know I don’t have a lotta love for the yardbird, but this little gem makes me change my mind!

I Like to Call them Criscuits…or Broissants…

1

Ahhhh. Saturday. Sweet, sweet Saturday. I had every intention of waking up early, taking a long walk, and then doing a little work. I know, I know. What was I thinking-work on a Saturday??

Buttermilk Biscuits

What was I thinking? Work on a Saturday??

After a lazy cup of coffee and listening to Chris Robinson Brotherhood, I changed my mind. Drastically. What were the new plans? Flaky buttermilk biscuits. Gardening. Hangin’ with The Hubbs and the doggies. Firin’ up a smoker. Sittin’ on a porch. After all, it is National Relaxation Day! Starting my Day of Enjoyment with biscuits sounded just perfect.

Now, I must tell you. I do not, repeat, do NOT have a good track record with biscuits. I can remember making something akin to a hockey puck in Home Economics with Mrs. Schlegel. Don’t get me wrong, it wasn’t her fault. Other kids had tall, billowing, glorious biscuits and I had short, sad doorstops. I’ve tried every method. Cutting butter with knives, breaking it up with your hands, lard, varying flours, eggs, and no eggs all with no luck. I think I even consulted a Shaman and burned sage to release evil, biscuit-destroying spirits from my kitchen. Alas, the biscuits were always chewy and dense, not flaky and tender. And then, serendipity smiled down upon me in the form of a Cook’s Illustrated recipe.

It appears the secret to peelable, flaky layers in a biscuit is to get the butter both cold enough and the right size to laminate it between layers of dough. Freezing the butter and grating it with a chilled cheese grater works perfectly. Folding the dough and rolling it out several different times, much like making croissants, provides for unparalleled flakiness. Triumph! Elation! The skies parted, the birds sang, the morning sun shone down upon me, and the Criscuit was born (cue ‘Morning has Broken’ by Cat Stevens)! For the first time in 26 or so years, I made a biscuit worthy of eating more than one (or even a whole one!).

These biscuits are very much a cross between a biscuit and a croissant. They kind of conjure up memories of those peely-flaky biscuits in the pop can, just sans the chemical faux butter taste, weird rubbery texture, and the sudden cardiac death induced by the popping noise when opening the can. So, just the flaky layers I guess? Give them a try. You will be delighted.

Flaky Buttermilk Biscuits (or Criscuits…or Broissants)

  • 3 cups soft, all-purpose flour
    • Choose all-purpose flour as it does not have leavener
    • Southern flours made from soft winter wheat, such as White Lily, have less protein & gluten and make for a less dense biscuit
    • Substitute cake flour like Swan’s or try Martha White if you can’t find White Lily
  • 2 TBSP granulated sugar
  • 4 tsp baking powder
  • 1/2 tsp baking soda
  • 1 and 1/2 tsp salt
  • 16 TBSP butter (usually 2 sticks), frozen in the wrapper for 30 minutes
  • 1 and 1/4 cups whole cultured buttermilk
  • Insulated baking sheet or light-colored baking sheet
  • Chilled large bowl
  • Chilled cheese grate with large holes

Line your baking sheet with parchment paper cut to fit. Mix dry ingredients well in your chilled bowl.

Flaky Buttermilk Biscuits

Mix dry ingredients in chilled bowl.

Remove butter from freezer, remove wrapper and lightly roll in dry ingredients.

Flaky Buttermilk Biscuits

Rolling the frozen butter in the dry ingredients helps your keep a grip on it as you grate.

Grate your frozen butter down to the last TBSP. Lightly roll butter gratings in the bowl to coat with flour. Repeat with second stick of butter. Save the (2) TBSP of butter left after grating.

Buttermilk biscuits

Grating frozen butter creates perfectly sized pieces. No more stabbing at the butter with a set of knives!

Add buttermilk and fold ingredients until just mixed. You will have dry flour and the dough will look shaggy. Do NOT add more buttermilk to wet all flour.

buttermilk biscuits

Somewhat dry, shaggy dough is what you’re looking for. Don’t be tempted to add more buttermilk!

Turn dough onto lightly floured surface. Form a roughly 8 x 12 inch rectangle and press dough together. Then roll the dough a bit to get it to form enough to fold.

flaky buttermilk biscuits

Getting ready for the first fold. The dough doesn’t really hold together at this point, but that’s exactly how we want it!

buttermilk biscuits

Roll the dough a bit to get it to form enough to fold.

Fold the bottom up and the top down as if you were folding a business letter. This first fold will be messy. Use a bench scraper or spatula to help release the dough from the surface. After folding the ‘letter’, turn the dough 90 degrees and roll it out again.

buttermilk biscuits

The biscuit dough folded and ready to be turned prior to rolling out again.

After rolling, fold the dough like a business letter again. The turn it 90 degrees and repeat rolling, folding, and turning 3 more times for a total of 5 ‘letter’ foldings. After the last folding, roll the dough into roughly a 9 x 9 inch, 1 inch tall square.

FullSizeRender 7

Did you make it through all that folding, turning, and rolling? Now the dough is ready for resting.

Place the dough on the parchment lined sheet, wrap the sheet in cling wrap, and refrigerate for 30 minutes to let the gluten relax.

buttermilk biscuits

Place the dough on your parchment lined sheet and cover to rest in the refrigerator for 30 minutes.

After the dough has been in the refrigerator for 30 minutes, place your oven rack in the top third position and preheat your oven to 400 degrees. After the 30 minute refrigeration is done, remove the dough and unwrap it. In a pressing motion with a sharp, floured knife, cut 1/4 inch off of all sides of the dough. Limit dragging a knife back and forth as the sawing motion binds the layers together, decreasing rising. Continuing with the pressing motion, cut the dough into 9 squares. Resist patting the sides of the dough where it was cut to ‘reshape’ or ‘reform’ it as it limits rising. Set biscuits about an inch apart on the parchment lined sheet. Melt the (2) TBSP of butter left from grating and brush the tops only (again, fiddling with the sides seals the layers together and limits rising).

flaky buttermilk biscuits

Ready for baking. If you look closely you can see the layers on the sides of the biscuits!

Bake at 400 degrees for about 20 minutes total, turning at about 10 minutes, or until tops and bottoms are lightly golden.

flaky buttermilk biscuits

Yes, please! The best part is peeling back the layers while they’re still warm.

Pair up with butter and jam or savory treats like sausage gravy or bacon and eggs. Fresh whipped cream and ripe strawberries work well for a simple dessert too!

Cucumber Sour Cream and Onion Chips

1
Cucumber Chips

MMMM…Potato Chips. I can’t even bring them into my house. Especially Sour Cream and Onion potato chips. Seriously-I.Have.No.Will.Power!

I’m not the only one that has a potato chip fetish, er, problem. In recent years the potato chip market generated over 16 billion in revenues per year. I don’t turn my nose up at any chip but I’m a complete and total sucker for Sour Cream and Onion potato chips. I don’t know that the chip is where it’s at when talking about Sour Cream and Onion chips. After all, I have been known to lick the powdery dusting off of them when in a glassy-eyed potato chip daze. So, in my continual search for eliminating processed and high glycemic foods in my diet, I began thinking about ways to get the same Sour Cream and Onion fix without all the muffin top-inducing effects of a traditional potato chip. I think Wilford Brimley had it right….

Cucumber potato chips

Yep. Tha ‘Beetus. Nobody wants it.

After trial and error, I think the Cucumber Sour Cream and Onion Chip is where it’s at. Cucumbers are flavor neutral enough to not get in the way of the tart flavorings and can be easily sliced thin enough to get some crisp on when placed in the dehydrator. Cooled and packed in a Ziploc with a desiccant pack, they’ll stay crisp enough to keep around for a week or so. Feel free to make double or triple the recipe…these things are seriously addictive. We can’t even wait for them to cool down before we’re going at ’em like rabid dogs. Trust me on this.

Cucumber Sour Cream and Onion Chips

  • 2 cucumbers
  • 2 TBSP Light Tasting Olive Oil
  • 2 TBSP Cultured Buttermilk Powder
  • 1 TBSP onion powder
  • 1 tsp dried dill
  • 1/2 tsp garlic powder
  • 1/2 tsp salt
  • Food processor or mandoline (get yourself a handheld one here)
  • Dehydrator with mesh inserts (allows drying of smaller or thin items)

Whisk olive oil, buttermilk powder, onion powder, dill, garlic powder, and salt in a bowl.

Cucumber Chips

Mixing up the ‘chip’ flavoring. The cultured buttermilk powder really does the trick!

Wash and peel your cucumbers as the skin can get a little bitter when dehydrated. Slice your cucumbers at about 2-3 mm thickness.

Sour Cream and Onion Cucumber Chips

Thin slices = less time until you eat chips!

Working in small batches (about 1/2 cup), very gently toss the cucumber slices in the olive oil mixture.

Cucumber Chips

Gently coat the cucumber in the olive oil mixture. Working in small batches will help prevent the salt in the olive oil mixture from drawing out too much water from the cucumber and/or causing the cucumber to fall apart.

Place in single layers on dehydrator racks and dehydrate according to manufacturer settings until crisp.

Sour Cream and Onion Cucumber Chips

Ready to dehydrate. The waiting is the hardest part. Make enough for a week if your dehydrator is large enough. You’ll need them.

Mine generally take 6 or so hours at 135 degrees.

Cucumber Chips

Super crisp and melt in your mouth if cut at 1mm…the crisp and body of a potato chip at 2-3mm. Either way you’re going to need a lot of these…they’re just too good to put down. Forget a standard potato chip…I’m not even looking back!

Cool completely and store in a Ziploc with a desiccant pack in the refrigerator. Next time your snack attack hits…reach for your cucumber chips and you won’t have to feel bad for a minute!

Who needs Crackers and Chips…I’ve got Cabbage!

0
Cabbage chips

Need a little chip for your work week (or any other time) snack? Try cabbage chips! They’re big enough to hold some serious eats and let you snack until your heart’s content with no guilt. Beach season here I come!

‘Tis the season of sweat. The more your parts aren’t sticking together, the better. Am I right? Much like the rest of the country, I’m always looking for ways to reduce my habitus. Cutting back on carbs always seems to work wonders. But what’s a girl to snack on during movie time? Or who’s gonna help you with your hummus, guacamole, or olive tapenade during lunch time? Cabbage, that’s who. Wait, what? Are you suddenly conjuring ideas of digging into a steamy bowl of braised cabbage while renting 50 Shades of Grey? Flashes of guacamole atop your pile of shredded cabbage? Probably. But that’s not what I mean.

So, undoubtedly you’ve heard of the A-lister favorite, kale chips. Yes, they are good, but they’re a bit like seaweed, get soft fast, and there’s no putting any kind of dip on a kale chip. You could make up some cauliflower crackers, but they do indeed taste a bit like cauliflower (amazing, I know). So, in my hunt for something with a least a little crunch, no grains, fairly flavor-neutral, and big enough to put some dip on…I found cabbage. Much like using collards in place of bread or wraps, using cabbage in place of chips or crackers wipes out grain consumption and reduces carbs and calories.

Trust me, try these and they’ll be a new tool in your fight for wearing your favorite thong bikini!

Cabbage Chips

  • 1 head of cabbage (use regular or savoy), separated into leaves, stems removed
  • Salty water for blanching
  • Ice bath
  • Paper towels
  • Salt and pepper to taste
  • Dehydrator

Gently peel the leaves of cabbage away from head, keeping the leaves intact. Remove stems and blanch. Plunge leaves into ice bath. Drain and pat dry with paper towels (or tea towels to reduce waste). Cut leaves into desired size (for crackers I usually split larger leaves down the middle and keep smaller leaves intact). Place the leaves in a single layers in your dehydrator and season them to taste with salt and pepper.

cabbage chips

Cabbage leaves ready for dehydration. Three hours until crunchy goodness.

Dehydrate according to your model’s directions until the leaves are crisp. Mine took 3 hours at 135 degrees. Let the chip-crackers cool completely. To keep them crisp all week, place them in a large Ziploc bag with a desiccant pack and store in the fridge. Feel free to snack away-that thong bikini will still fit!

cabbage chips

These chips hold up. Although they’re difficult to dig into dip with, they’re perfect for smothering in guacamole, salsa, hummus, tapenade, or otherwise. They’ll bend a little, but won’t crumble like kale chips. They’re the perfect go to instead of crackers or pita bread points.

The Mightly Collard Wrap

1
Collard Wraps

The mighty collard. Once saved for cookin’ up ‘a mess’ on New Year’s Day and now making an appearance in your work week lunchbox!

The mighty collard. They’ve been eaten in the South for centuries and around the world since at least Ancient Roman times. African, South American, and Middle Eastern countries all have their own methods of preparing them as main or side dishes. Generally in the South, we slow braise ‘a mess’ of them with salted or smoked meat, onions, pepper, vinegar, and a dash of sugar (and sometimes tomato). It’s an all day event that can both warm and stink up a house. Summertime in the South where temperatures are hotter than the hinges of Hell is not the time for a bubbling cauldron of greens no matter how delicious the outcome.

If you still want to get in some of the great properties of collards (vitamin C, fiber, and antiviral, antibacterial, and anticancer properties) but want to maintain your ‘air of elegance’ during the heat of summer, try using them as sandwich wraps instead. It’s a great option for those sensitive to wheat or grain and they are super easy to make, keep for days in the fridge, freeze easily, and pack a ton of flavor. For those looking to shed a few pounds in order to squeeze into your speedo, they only pack a few calories per leaf. You can also use the same preparation here and then slice thinly and add to cold salads. If you’re daring, try blanching mustard greens or horseradish tops to use as your wraps or in salads. It’s best to prepare a mess ahead of time and vacuum and freeze in batches to save yourself some work.

Collard Wraps

  • Mess of whole leaf collards (usually come in 2 -3 bunches), stems removed
  • Salty water for blanching
  • Ice bath

Working in small batches, blanch collards and submerge in ice bath. Drain on layers of paper towels. Layer in groups of 2-3 leaves for each wrap and place in an airtight container for use during the work week. Alternatively, layer in groups, roll up, and vacuum pack. Freeze for later use.

collard wraps

Blanched collard with stem removed. Blanching makes the collard less leathery and a bit more sweet.

collard wraps

Layer 2-3 blanched leaves, making sure to overlap the slits where the stems once lived.

I generally use 2-3 leaves per wrap, overlapping the slits where the stems once lived (otherwise your stuffing sneaks out). Spread your filling out and proceed to wrap like burrito.

collard wraps

Spread your filling out a bit along one edge.

FullSizeRender 56

Collard burrito!

I keep enough for 3 or so wraps in the fridge to use during the work week. I always have some on hand since we work in big batches and freeze them. No more running to the store for bread or wraps (they defrost quickly in their vacuum bag in a sink of warm water)! Thinner greens like mustard or horseradish take a little care in handling so they don’t tear. Try mustard greens with egg salad and bacon or horseradish greens with grilled beef. You won’t be disappointed!

collard wraps

Low carb, grain free wraps AND collardy goodness year round. Win! Win!

Who Needs Easter Ham Anyway!

0
Bunny cow

Who says you have to have ham for Easter???

Easter brings back memories of a big ol’ Easter Ham. You know the one. All glazed and dotted with whole cloves. Maybe you threw some pineapple slices and maraschino cherries on for old times sake. Yeah, that ham.

Ribeye Roast recipe

Oooohhhh…decorative and painful. So painful.

Traditionally hogs were slaughtered in the Fall and without refrigeration pork was cured for Spring. Voila, Easter Ham. Don’t ask me what 1950’s foodie added pineapple, Maraschino cherries, and cloves (did I mention Maraschino cherries smell like that starfish I dissected in 7th grade??). The process of turning fresh pork into ham is indeed magical, but I’m challenging you to give up the ghost and go for a standing rib-eye roast instead. Take it up a notch, enjoy the budding warmth, and bust out your grill. That’s right, pull out your outdoor speakers, blare some Winger (yes, Winger), pour yourself some wine, and drag the dog beds grill side. I’m a pork lover and I promise you I’m not looking back. That ham is gladly reserved for those cute little ham sandwiches your Grandma made on dinner rolls. This Easter I’m all about the beef!

Cooking a standing rib-eye roast might seem daunting, but trust me, with a few basic skills you’ll have this thing mastered. Better yet, you’ll impress the h-e-double-hockey sticks out of your friends and family!

Grilled Standing Rib-eye Roast

  • 5 pound (usually 3 ribs) rib-eye roast, bones included.
  • 2 TBSP cup kosher salt
  • 1/2 tsp dried rosemary
  • 1/2 tsp dried fennel seeds
  • 1/2 tsp black pepper corns
  • 1/8 tsp dried sage
  • 1/8 tsp garlic powder
  • 1/8 tsp onion powder
  • 1/2 dried bay leaf
  • 1 TBSP oil
  • kitchen twine
  • 30 charcoal briquettes & your charcoal grill
  • Lotsa time to kill, Girl’s Best Friends, Winger’s Greatest hits, bevvy of choice

Prepare your roast by rinsing and patting it dry with paper towels. Cut the bones away from the roast (save them!). Some say to trim the fat to 1/8th of an inch. Go ahead if you’d like, but if you trim fat in my house you will surely end up with broken fingers, a bloody nub, and a black eye. Seriously. Don’t. Do. It. You can cut fat off later if you want (I might very well look at you in disgust if you do), but cutting it off beforehand sacrifices flavor and juices in my opinion.

1311948270220

Why would you cut OFF the fat????

Coat roast in a thin layer of oil. Place all spices in a spice grinder. Or try your trusty, dusty $10 Mr. Coffee grinder saved just for spices and grind spices until powdery. Mix with your salt and spread on a rimmed cookie sheet.

FullSizeRender 16

Put all of your spices into your grinder of choice and grind until powdery.

Grilled Standing Ribeye Roast

Mix well with your salt and spread evenly on a rimmed cookie or baking sheet.

Press the roast and bones into the salt until evenly coated.

Grilled Prime Rib

Salty goodness = crusty grilled goodness. Don’t be afraid of the salt!

Truss the roast and bones together. Hit up this video at 15:01 or so to see the best and quickest method for trussing your roast. It’s a bit ‘slight of hand’ but a good skill to learn for any large roast. Set your roast aside and cover with a clean tea or kitchen towel. Let rest 2-3 hours (don’t skimp on time people! This desiccates the outer layer to make a righteous crust). You want the roast to be room temp when you put it on the grill. And no, you won’t die from the roast sitting for 2-3 hours in a 68 degree house. Remember you’re going to cook it and you have stomach acid at about a pH of 0.8.

About 20 minutes before you’re ready to throw your Easter Hunk O’ Beef on the grill, light about 30 briquettes and let burn until they’ve formed a thin coating of white ash. Once covered in ash, make a dual layer pile of charcoal on one side of your grill. Let the grill heat 5 minutes and scrape clean. Place your roast fat side down and sear until all fat covered sides are brown, about 10-12 minutes (depending on your fire heat).

Grilled Ribeye roast

Sear that thing!

Once browned, insert a constant read thermometer (not touching the bones) and place the roast with the tips of the bones away from the fire. This puts the thickest part of the roast towards the heat so it cooks more evenly.

Cooking Rib Eye Roast

Place the roast with the thickest portion towards your coals. This will help the roast cook more evenly.

Be careful of flare ups in the beginning when the fat is rendering. Do you see that little spot o’ burn in the picture above…that’s a result of flare ups. Don’t cry for me Argentina, it’s a small spot and will work itself out in the end. Much more burn though and you’ve spent a lot of time and moo-la making a charcoal lump. Place your grill lid on, grab your bevvy and settle in. You’re going to cook your roast until about 125 degrees for medium rare. We went up to 135 for a medium-medium rare. This can take 1.5 to 3 hours depending on the size of your roast and the heat of your fire. The roast will ‘rest’ on the counter for about 15 minutes and the temp will raise 10-15 degrees so don’t fret about under cooking it a bit. No matter what temp you like, cook the roast 10-15 degrees cooler and let it rest.

Grilled prime rib

That twine has seen better days….but dang! That meat looks good. If the crusties I picked off are any indication, it tastes just as good as it looks!

Ribeye roast

Come to mama!

Slice that awesome thang to desired thickness and serve with horseradish sauce, taters, and your choice of veggies (we had balsamic grilled asparagus and it was delightful!). I promise you won’t miss that pineapple-cherry-clove Easter Hamnanigans.

Grilled prime rib

Fixin’ to get real in tha house!

DIY Black Limes (and why you need them!)

0
IMG_9890

Black limes, or dried limes, are a magical way to give new life to your cooking.

‘What is a Black Lime’, you say? On one hand it’s simply a dusty, blackish-brown, dehydrated whole lime common in Middle Eastern cuisine. On the other hand, it’s 100% magic. Yup. Magic. I frankly don’t even remember where I heard about dried limes, but I can tell you when I first tasted their magical goodness: Okra and chicken liver stew. I stopped by a restaurant near work one Friday night after a loooong day at work, figuring I’d just go ahead and get dinner, a glass of wine, and kill some time while traffic died down. There were so many normal things about that stew—the familiar little carrot squares, peas, corn kernels. Okra, of course. Perfectly cooked chicken livers (no sawdust or rubber to be found) and a tomato broth equipped with those little sparkling dots of fatty goodness. But then there was some kind of tangy, fresh goodness. By all accounts, a stew that most likely started off with rendering some bacon fat should’ve sat a bit heavier, but it didn’t. It was so good I had it again later that weekend! I didn’t know then what the magical goodness in that stew was, but the first time I cooked with dried limes I was immediately brought back to that stew. Dried limes. I’m 100% sure. I’ve been tempted to ask the Chef since I see him in the mornings unloading the truck from the market or feeding a little stray cat that hangs around, but I figure accosting him about the nuances of his cuisine might seem a bit whacko.

Back to the limes. Trust me on this. Either buy yourself a bag online or make your own. This is a great project for the winter since you’ll have your oven on low for a day or two. The flavor is bright and citrusy while also being earthy and grounding. They go well with heavier meats such as lamb and beef and also pair well with lighter soups and stews. They can be used whole or ground up. You’ll be hooked from the first bite!


Dried, or Black, Limes

  • Limes (go ahead and do a bunch while you’re at it!)
IMG_9843

Get yourself a big ol’ batch of lovely limes.

Blanch your limes in small batches and be sure to cool completely in the ice bath.

IMG_9844

After blanching your limes, make sure they are fully cooled in an ice bath.

Dry. Place the limes on a baking rack set on a baking sheet.

IMG_9846

After blanching the limes go into a low heat oven.

Place your limes in a 150-200 degree oven (depending on how low your oven goes-mine was 170 degrees). If the limes will fit in a dehydrator you have, even better (mine where a bit too big)! Let them rip, turning a couple of times a day, until completely dry.

IMG_9851

About a day in the limes begin to appear dry and change color. The oven mimics the drying effects of the traditional method of drying the limes in the sun.

When done, they will be slightly bigger than a ping-pong ball and feel light and hollow.

IMG_0125

About two or so days in the limes are black, light, and feel hollow.

If you’re not sure if they’re done, crack one open and you’ll find dark flesh that’s dry and flaky.

IMG_0122

When done, the interior is dry and flaky with the smallest sticky drops on the interior flesh.

Mine took about 2 days. The time to be dry will depend on the amount of juice in your limes. Be patient, they’re worth it! As a note, I did take mine out of the oven a couple of time to cook, then just let the oven cool a bit and popped them back in at 170 degrees. They tuned out perfectly.

IMG_9890

Lovely magical dried limes!


IMG_0135

Try dried limes in your next stew, soup, or sauce. Use them whole or grind them up. You’ll be looking for excuses to use them, I promise!


Lazy Braisin’ Beef

0
IMG_0011

Super easy braised beef is perfect for rainy days…or hey, any day will do!

So, it’s a rainy day. And a bit chilly. And The Hubs is working on something in the office. I won’t say I’m bored, but I’m in need of something to hold my attention for a little while. In addition, I guess the Holidays had me thinking about my Grandma (Memaw). I can remember her and my Aunt Liney flying out to Oregon as a surprise after Ken and I moved there and fixing a seriously beefy casserole one night. It was super simple: A mixture of ground beef, Lipton’s onion soup mix, tomatoes, and pasta. I’m pretty sure it was a food-child of the 50’s when dinners where often a conglomeration of various quick, fairly processed foods. I don’t care. It was seriously addictive. There’s no way it should have been, but it was. Something about the super beefiness, the tang of tomato, and the caramelized flavor from dehydrated onions in the soup mix. That casserole was the inspiration for this super easy, ‘Lazy Man’s’ braised beef. It takes about 2 seconds to throw together and then a few hours of no-touch time in the oven. You do need a little patience, but not a whole lot more.

IMG_9351

All you need is a little patience!

When it’s done, throw it in a bowl or pair it with creamy corn grits for a super treat. It’s seriously beefy, hits the spot, and sticks with you.


Lazy Man’s Braised Beef

  • 3-4 pound,well-marbled chuck
  • One 32 ounce can diced tomatoes
  • Gel Beef bouillon (Organic Beef Better-Than-Bouillon)
  • 2 TBSP dehydrated onions (in spice section)

Place your chuck in a pan large enough to hold it with a tad of extra room. Add 1/2 of can of tomatoes. Add enough water proportionately mixed with beef bouillon (read container) to come half way up beef sides. Sprinkle dehydrated onions on top.

IMG_9994

It’s as easy as throwing everything in a pot and waiting!

Place lid and place in 275 degree preheated oven until tender but not stringy. I find this takes somewhere around three hours. If it’s not like butter with fat and connective tissue dissolved, return to oven and check every thirty minutes or so.

IMG_0002

Look at that good business….like budda!

Once super soft, pull out the meat and reserve on the side. Place the pan with juices and tomatoes over medium high heat. Add remainder of tomatoes. Bring to gentle boil and reduce by half until flavors are intensified. Adjust seasoning if necessary (salt, pepper, bouillon addition). Reduce heat to low. Once the beef cools to the touch, pull apart into chunks and submerge in the au jus.

IMG_9999

Pull that beef into chunks and get ready to feast!

Feel free to add sautéed mushrooms and/or serve over creamy corn grits (don’t knock it ’till you try it!). I’m pretty certain Memaw would’ve been proud!

IMG_0011

Get it!