Ra-Ra-Ra-Ribs!

0

The weather’s starting to cool here a bit and that means it ‘s the perfect, perfect time to set up camp on the back porch and break out all of the barbecuing toys. And barbecuing toys mean ribs, ribs, and more ribs. Some associate ribs with the sweltering, surface-of-the-sun heat of mid summer, but I much prefer them when the weather starts to turn and football is in gear. There’s no way to cook ribs quickly, so that lends itself to a few hours of watching football, having some bevvies, and hanging out. Just when everyone’s getting tired of chips and dips and their adult beverages are getting the better of their appetite control…enter the rack o’ ribs. Started when everyone arrives for festivities, they finish up right when everyone is ready to chow down.

If you do a quick search of The Interwebs, there are hundreds of ways people swear by to get that juicy, tender, fall off the bone rack of ribs. I listened to none of those. Nope. I went straight to the source of the best ribs I’ve ever eaten. Dad. The Hubbs, the dogs, Pam and Dad and I hung out one afternoon and I decided it was time for the Pirate Incarnate to relinquish his secrets. I was terrified I’d mess them up (since we were all there for dinner!), but with the guiding hand of The Pirate Master I learned all I needed to know-and it was surprisingly simple.

It seems there are several keys to good ribs. A good rub. A good sear. A low and slow braise (aka the ‘Texas Crutch’). Time, time, and more time. A little patience (*hums Guns and Roses*). And a good sauce to finish ’em on the grill. It’s not hard and the reward is a tasty, tasty pile o’ meat. Win, win!

Ribs

Mmmmmmm. Riiiibs.

What you’ll need for some Homer Simpson, lip-smacking, finger-licking ribs:

  • (2) racks of pork ribs
  • Gas grill

For the rub:

  • 1/2 cup brown sugar
  • 1/8 cup salt
  • 1 TBSP paprika
  • 1 TBSP dried celery
  • 2 tsp black peppercorns
  • 2 tsp cumin
  • 2 tsp dried mustard powder
  • 1 tsp fennel seed
  • 1 tsp smoked paprika
  • 1 tsp onion powder
  • 1 tsp garlic powder
  • 1/2 tsp white pepper

For the Eastern North Carolina sauce: (This sauce is fully adjustable and not a science; Adjust to preferences)

  • 1.5 cups apple cider vinegar ( I use Bragg’s Apple Cider Vinegar)
  • Tomato paste (I use about 1 TBSP-but you may like more or less; Adjust to taste)
  • 2 TBSP brown sugar (use dark if you like a bit of molasses flavor)
  • 1 TBSP salt
  • 1 tsp crushed red pepper
  • 1 tsp finely ground black pepper
  • For more heat, feel free to add hot pepper sauce, like Cholula Hot Sauce)

Also:

  • Apple juice, apple cider, beer, or stock for braising (I’ve even used water in a pinch!)


Blend all rub ingredients in a food processor or in batches in a spice grinder or coffee grinder. Rub generously into ribs. You should have enough to cover (2) racks of ribs. Let rest at least an hour, covered, on the counter to bring the temperature of the meat up to room temperature. If you’re a good planner, you can cover your rubbed ribs and let them chill in the fridge over night. Just make sure to bring the ribs up to room temp prior to cooking.

In the meantime, mix your sauce ingredients thoroughly and heat to simmering. Simmer for 5 minutes, remove from heat, and cool.

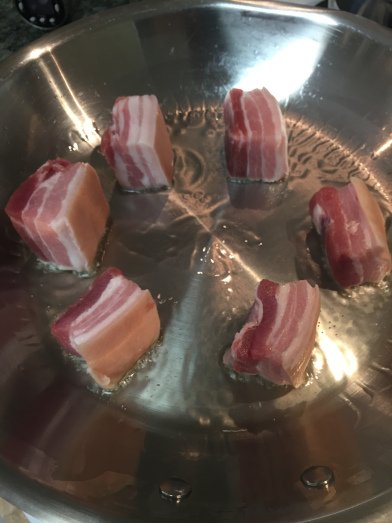
After your ribs come to room temp, heat your grill to Hinges-of-Hades hot. Quickly sear the ribs, about 5 minutes per side. Turn your grill off. Preheat your oven to 325 degrees.

IMG_2129

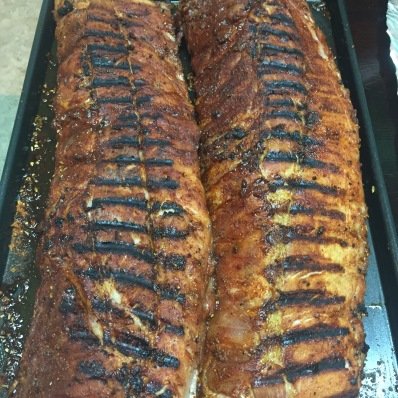
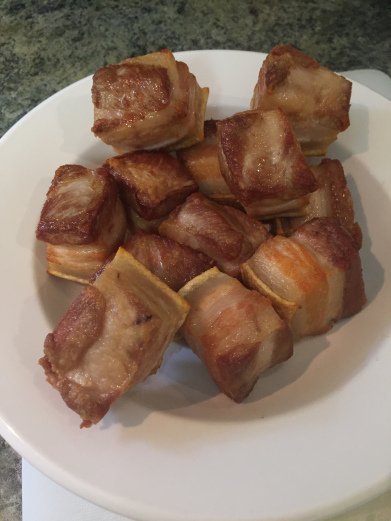
Perfectly seared ribs

After searing the ribs, wrap each rack in a double layer of aluminum foil with a quarter cup or so of liquid (apple juice, apple cider, beer, or stock work well).

IMG_2130

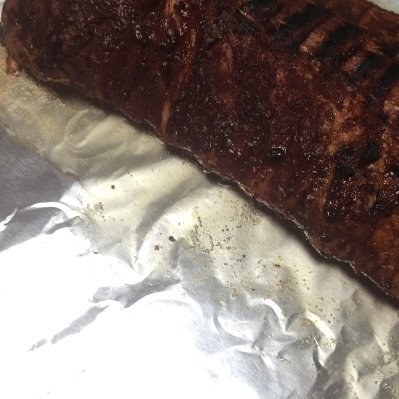
See the bit of liquid at the edge of the ribs. You just need a bit to effectively braise the ribs.

Close the packets tightly, folding the edges neatly and tightly. You don’t want the steam to escape as we are essentially braising the ribs.

IMG_2132

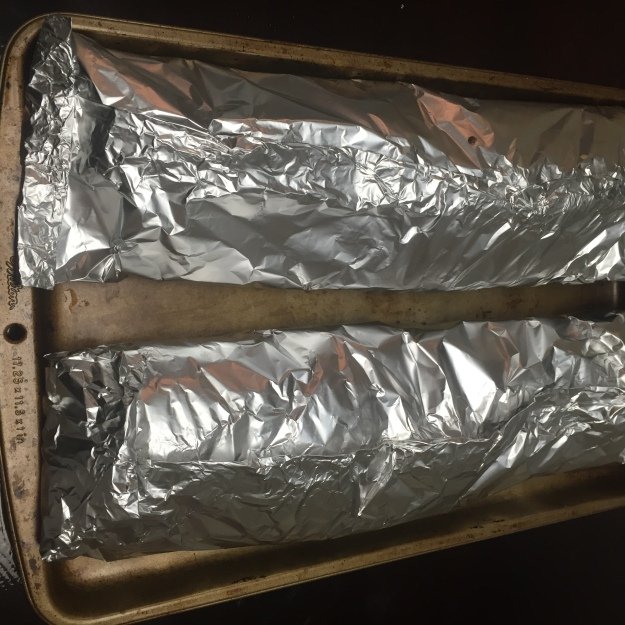
See the neat, tidy folds that close the package? No wadding up of aluminum foil allowed. You don’t want steam to escape and you want to be able to get in and out of the packets quickly to test whether the ribs are tender.

Pop the packets into a preheated 325 degree oven and cook until the meat begins to pull away from the bone a bit and the meat is fork tender but not falling apart.

IMG_2135

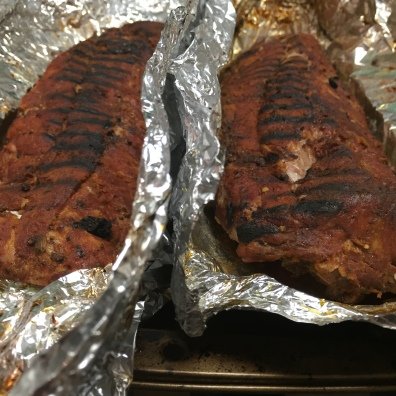
Ribs after the crutch.

IMG_2133

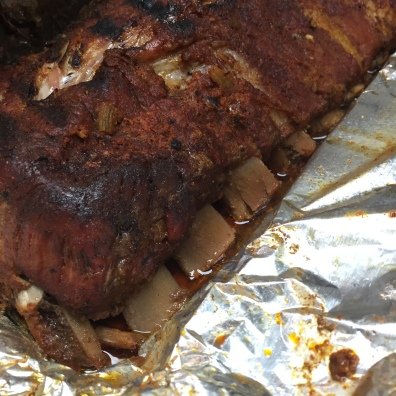
See the meat pulling away from the bone? Yeah…that means melt in your mouth goodness.


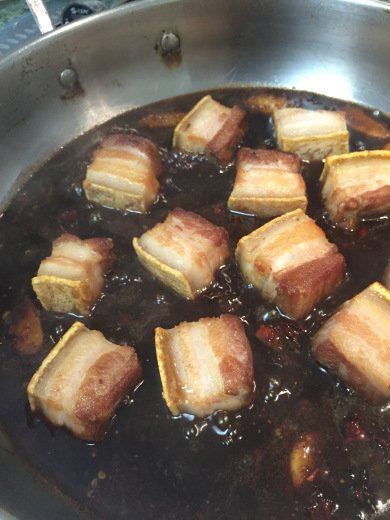
When the meat is tender, about 2 hours, remove the packets from the oven at allow to sit (still wrapped) for 10-15 minutes. Heat your grill to approximately 400-500 degrees. When you grill is at temp, unwrap your ribs, and coat with sauce. You can use the North Carolina Vinegar sauce or a sauce of your choosing (Mustard sauce is a favorite in these parts and a good, smoky tomato-based sauce works well too). Place the ribs on the grill and cook 2-3 minutes per side, working only to achieve crusty bits, color, and caramelization of sauces as the ribs are already cooked at this point.

IMG_2137

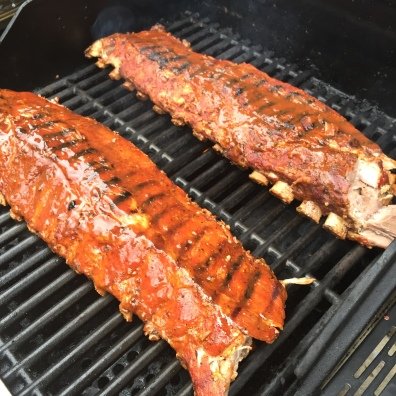
Finish the ribs on the grill for sticky sauce that’s finger-lickin’ good. Eastern North Carolina sauce can be placed prior to the ribs going back on the grill and/or afterward.

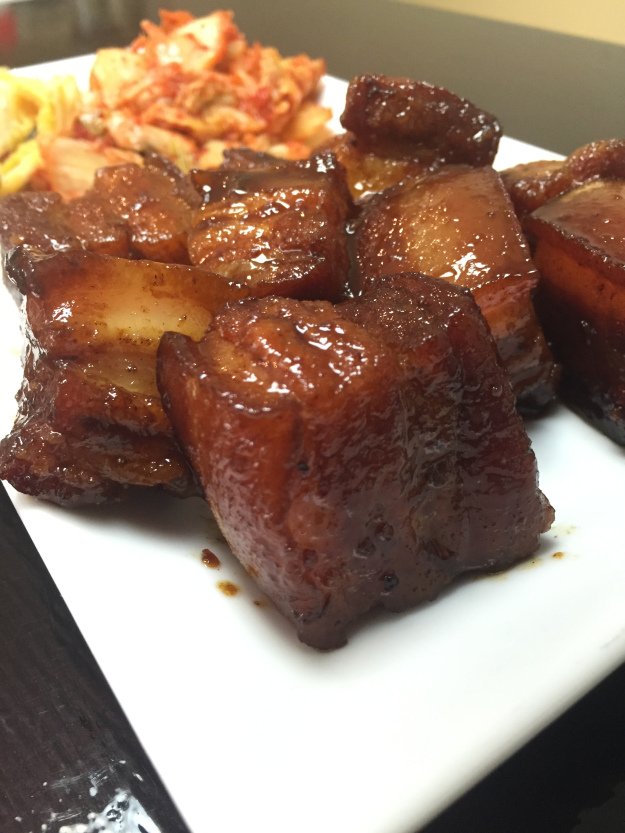
Remove your ribs from the grill and allow to rest, loosely covered in aluminum foil, on the counter for 10 minutes. Create some elbow space and grab your brew. I highly recommend an American Lager with BBQ (hello Pabst Blue Ribbon!). Trust me, it’s better than it sounds! Commence to digging in!

**Note the conspicuous lack of plated pics. Taking time for plated pics was not an option. I had to get all up in it or there would have been none left!**

Shanghai Red Cooked Pork Belly

2

I first fell in love with Chinese red cooking when I adapted a red cooked beef finger recipe. It was truly addicting. So much so that I ran, nay sprinted, many blocks, in flood water rains to procure the necessary items to make steamed bao buns. During the treacherous drive home, my mind had a stroke of genius…if red cooking made beef that tasted like a magical gift from the heavens, what would it do for my dear and longtime friend, Mr. Pork Belly. If the fatty beef fingers were delectable in the deeply satisfying red-cooked sauce, I knew beyond a shadow of a doubt that Mr. Pork Belly would be absolutely divine. So, I sprinted again, through monsoon rains to our local Asian market for a couple of pounds of pork belly…and a cup of hot tea, a bowl of beef Pho, and a cruise around the store to pick up $100 bucks or so of stuff I absolutely needed (quail eggs, new chopsticks, wuyi oolong tea, sake, rice seasoning, etc.).

Like the beef recipe, most pork belly recipes called for blanching the meat prior to braising. Like the recipe for Chinese Red-cooked Beef, I opted to sear the meat to add to the depth of the final dish. I also wanted a bit of the ‘bark’ or crispier edges that searing provides. Again, bao buns were on my mind. Soft pillowy clouds wrapped around crispy, sticky, sweet and salty pork nuggets, all laced with spicy Kimchi. Yes. Please.

The ingredients are identical to my Chinese Red-cooked Beef recipe, but pork belly brings a whole new level of business to the game. Add Kimchi and you are all up in it. All I can say is ‘no leftovers’. What? Yep. No leftovers. I shouldn’t admit it, but we (proudly) took down 2, count them, 2 pounds of pork belly. It took a whole day, but we indeed did it (and made sure a hefty workout was on the books for the next day!). This stuff is like meat candy. You’re gonna want to get on this. Pronto.

Shanghai Pork Belly

  • 2 pounds of pork belly, skin on, in 1.5 to 2 inch cubes
  • 1/2 cup sugar
  • 1/4 cup water
  • 1 and 1/2 cups dry sherry
  • 1/2 cup low sodium soy sauce or liquid aminos
  • 1 tsp white pepper
  • 1/2 tsp dried orange peel (you can substitute fresh zest if necessary)
  • 3 whole star anise
  • 1/2 tsp cinnamon
  • 2 red chilies, diced (or 1/4 tsp crushed red pepper flakes)
  • 2 tsp grated ginger
  • 1 garlic clove
  • 1.5 cups water or pork or vegetable broth (no or low sodium); as much as needed for appropriate liquid level

Caramelize your sugar and make the Sherry-sugar sauce just like in the Chinese Red-cooked Beef recipe. Next, brown those little nuggets of goodness, or pork belly cubes if you prefer to call them that (*frowns*). Remember, dry your pork nuggets thoroughly, make sure your oil is well heated, allow plenty of room between the nuggets, and allow the pan to come back to temp between batches. Remove the nuggets and set aside on a plate.

IMG_2270

Remember to dry the pork thoroughly, heat your oil well, and leave enough room between pieces so they don’t steam instead of sear.

IMG_2275 2

Golden pork nuggets!

Drain most of the fat from pan. I know, I know. I usually display exaggerated disapproving facial expressions at those committing the crime of ‘fat draining’, but sometimes there are exceptions. More fat will render during cooking and all will be well. Trust me. Now, reduce your heat to medium-low, add your dry spices to the pan, and heat them for about 1 minute. This allows the oils in the warmer spices to bloom. Add your red pepper flakes here if you’re not using fresh chilies. Next, add the soy sauce or liquid aminos. Add the ginger, garlic, and peppers. Deglaze the pan by scraping the bottom with the edge of a wooden spoon. Once all the good bits are worked free from the bottom of the pan add the sugar-sherry mixture. Return your pork nuggets to the pan, placing them in evenly in one layer.

IMG_2276

Check out the beautiful mahogany-colored sauce. The scent of star anise, orange, cinnamon, and ginger will fill the house. Commence drooling.

The sugar-sherry liquid level should come up to about 1/2 the level of the top of the meat (we want to braise the meat, not stew it). Add water, pork stock, or chicken stock if needed to achieve the appropriate liquid level. If you add stock, be sure it is no- or low-sodium as there is plenty of salt to be had otherwise. Bring the pork and liquid mixture to a simmer, place the lid, and tuck it away in your preheated oven. Cook until the meat is fork tender and the fat and connective tissue is dissolved, about 2-3 hours.

Remove the pork from the pan to a plate. Try really hard not to eat it right away. You will need to exercise extreme discipline at this point or perhaps try physical restraint. I am not ashamed to admit I failed (and earned a blister on the roof of my mouth to prove it!). Remove your star anise from the pan liquid and boil the sauce until it is glossy and reduced to about a cup.

IMG_2280

Look. At. That.

Serve meat, drizzled with sauce, over rice or with your favorite steamed or sauteed vegetable. My preference is sticky, salty, sweet pork nuggets tucked into airy Bao Buns, nestled alongside spicy and sour Kimchi, and paired with lightly wilted bok choy. None better. Broccoli, broccoli rabe, bok choy, kale, or spinach pair well too. Enjoy!

IMG_2279

Kimchi is the perfect partner.

IMG_2282

Eat it up. Shanghai pork and kimchi ride along perfectly in little puffy bao buns.


Tea and Molasses-Brined, Pecan-Smoked Pork with Peach Salsa

1
IMG_8451

Too good! Tea and molasses brined, pecan smoked, Boston Butt with peach salsa. You never had it so good!

Whew! That’s a mouthful! I really can’t shove any more Southern things in one recipe. Tea, Molasses, Pecan, Pork, and Peaches. Seriously….love! Love! Love! Now, some of you may think this is a big ol’ pain in the rear…brining overnight, long hours on the smoker. Well, first, it’s totally worth it. Just trust me on this one. And second, almost nothing makes me happier than tending a smoker all day (I’m so jealous of my buddy at work, Brad’s, awesome smoking ability that I have to practice, practice, practice!). It’s a great excuse to kick back, have an adult bev-er-aghe, and relax. Listen to the birds, hang out with Charlie-dog. Watch the grass grow. Whatever floats your boat. Now, some say smoking meat is an art. And I guess the fact that every BBQer has their own process and recipe for brines and rubs does make it a bit of an art. But there’s also a science to it. For this beauty, ya gotta go low and slow until the fat and connective tissue break down and move the meat from a dense, tough wad into a loose, tender delight!

Now, supplies. You need a non-reactive container large enough to hold the meat and brine. You need a smoker. Now, if you don’t have a smoker, you can still brine this beast and let it roll in a 225 degree oven. You won’t be sorry. I digress back to smokers…I use an electric one. Yes, gasp, electric. It’s what I started with when I had no experience, and frankly, I kept it out of being partly comfortable with it and partly lazy. The idea of tending coals to keep an even temperature completely ruins my put the meat on and ‘watch the grass grow’ philosophy. Last thing, you need wood chips (unless you’re doing the oven thing). I used pecan, but apple or cherry would work great too. Just no big, heavy ones like hickory or mesquite.

Now go get yourself a 5 pound pork Boston Butt and a 6-pack of Woodchuck Cider and come on back….

For Brine (heat all components together and let cool completely, or take my lazy way and mix together until dissolved):

  • 2.5 quarts water
  • 8 ounces molasses
  • 8 ounces Kosher or Pickling Salt
  • 4 bay leaves
  • 3 TBSP black tea leaves
  • 1 TBSP dry rosemary
  • 1 TBSP black pepper

For Rub (process in food processor until you reach sugar-nut-spice dust):

  • 1 TBSP flavor-neutral oil for coating meat first (gives rub something to stick to)
  • 2/3 cup brown sugar
  • 2/3 cup pecans
  • 1 TBSP dry rosemary
  • 1 bay leaf
  • 1 tsp black peppercorns
  • 1 tsp salt

For Peach Salsa

  • 4 peaches, slightly unripe
  • 1/2 jalapeno, cored and deseeded, chopped fine
  • 1 TBSP finely chopped red onion
  • 2 tsp brown sugar
  • 2 tsp apple cider vinegar
  • Salt and pepper to taste

Rinse your Butt (ahhhh….I couldn’t help it!). Place brine in large enough container to hold brine with meat submerged…a gallon Ziplock does the trick. Let ‘marinate’ and sit overnight, in the fridge, or at least a few hours.

IMG_8416

Pork’s in the brine!

Fire up your smoker according to your smoker type and wood chip preference-pecan chips were used here and 2 Woodchuck Ciders were used as the liquid to keep things from drying out.

IMG_8428

Get your smoker rollin’ before you’re ready to put the meat on…I find that keeps a bitter taste from forming with the first massive smoke production.

After brining, remove pork, discard brine, and rinse well to remove some salt. Pat dry with paper towels (or kitchen towels if you want your Hubbs to give you scornful looks!).

IMG_8419

Porky-pork is ready to go…you can see here how the brined portion is a bit darker that the close end that was sticking a bit above the brine solution.

Coat pork in oil lightly. Cover all visible porky goodness in the rub.

IMG_8420

Brown sugar, pecan, herb dust. Or rub. Whatevs.

IMG_8422

Lump-o’-meat covered in rub. Yeah, I got nothin’ witty about that!

Place your Pork-Masterpiece-In-Progress, Lunp-O-Meat close to the braising liquid (closest rack) and close up your smoker.

IMG_8429

Pork is positioned and ready to go…commence to watching the grass grow!

Feel free to indulge in your excess Woodchuck as things are brewing. On further introspection, you may have needed a 12-pack. After 2 hours, lift the lid and quickly dampen the meat with its drippings. Get back to your Woodchuck. In another hour, repeat. Repeat again in an hour (we’re up to four hours for those who have spent too much time with chain saws or too much time ‘catfish noodling’ and are missing the appropriate number of counting appendages). Now, your pork should be sitting at about 160 degrees. It will stall there and make you depressed that you will never get to eat that porky goodness. Don’t distress. We’re gonna fix that with a ‘crutch’.

IMG_8433

‘The Crutch’. This helps the meat reach the appropriate temperature to break down all the fat and connective tissue to produce a super-tender, juicy HUNK-O-MEAT! Oh…excuse me…I lost control of my senses for a minute there….

Remove the meat from your smoker and quickly wrap it in two layers of foil with a bit of liquid in the bottom. Seal super tightly. Put it back in the smoker and go, go, go until the internal temp reaches 190-200 degrees. ONLY THEN, remove your Early Christmas Present from the smoker and let it rest for about 30 minutes or so before shredding.

IMG_8446

Oh…My…Goodness. I’m not gonna lie…I debated clutching this thing like a lost pup and running into the wilderness just to prevent The Hubbs from having some. That. Good. You can see where we got all sortsa impatient and nibbled off of it before it’s photo shoot.

You can place the wrapped lump in a cooler for up to 4 hours and it will stay warm (as if you’re gonna be done before any guests arrive).

IMG_8441

Awww…aren’t those pretty peaches. Cut ’em up people! It’s salsa time!

IMG_8444

Peach salsa Yo!

Now, for the peach salsa. Just mix up your diced peaches, onion, and jalapeno. Add your brown sugar, apple cider vinegar, salt, and pepper. Taaa-daa! Done!

IMG_8451

Now that’s dinner!

Serve pork with salsa and creamy grits, salad, or side of choice. Certainly creamy grits are my favorite choice!

If your will is made of steel, save some pork for chile rellanos or awesome omelettes!

Rabbit Ragout

0
IMG_8355

Rabbit ragout with quinoa dumplings. Super satisfying but light enough for warm weather. And super easy!

So I found myself with a rabbit from and was debating on what to do with it. Then memories of a divine rabbit ragout I had at Glass Onion came to mind. Being that ragout is a one dish dealio, I figured it was good for doing mid-week and would only get better as I picked on it over the next few days. I won’t lie, I totally picked the wrong time to delve into this dish. No, not because it was difficult or time consuming. Mainly because I had just watched Miss Potter, a movie about Beatrix Potter and all of her furry friends, including Peter Rabbit. Yeah, that made dismembering the ol’ rabbit a wee bit harder. Images flashed of that cute little bugger in his tidy blue jacket, chewing on perfect little carrots was really gettin’ to me. I won’t lie, I think I told that rabbit ‘sorry’ about 100 times. Then, I realized I’d feel worse if I wasted the rabbit and got on with my business. The one good thing that comes from getting real about where your food comes from is you end up being all the more thankful for it. So, if you find yourself with some rabbit and really want to appreciate your food sources, get on with making this dish. You could also substitute chicken (or veal for the adventurous; or beef in winter) if that makes you feel a little better!

  • 4 pound rabbit, cleaned and cut into pieces
  • Oil, for searing (coconut oil works well)
  • 2 carrots, diced
  • 3 celery stalks, diced
  • 1/2 large onion, diced
  • 28 ounces whole tomatoes, crushed by hand, and juices
  • 1/4 cup dry sherry or marsala
  • 2 TBSP tomato paste
  • 2 sprigs rosemary
  • 2 bay leaves
  • salt and pepper to taste
  • 1 cup quinoa flour (or omit and it still is delicious)
  • fresh parsley, chopped, for garnish

Heat oil in large skillet or dutch oven. Dredge rabbit pieces in quinoa flour for a light dusting.

IMG_8326

Sear dusted (or bare) rabbit until golden brown or a good crust forms to seal in juices.

IMG_8329

Now we’re talking!

Sear until golden brown on all sides. Remove rabbit from pan and drain on paper towels.

IMG_8328

Add vegetables to pan and cook slowly until caramelized.

Add carrot, celery, and onion and cook until well caramelized (brown, but not burnt). Add 1/4 cup sherry or marsala and deglaze pan. Add tomatoes and tomato paste.

IMG_8330

After you’ve made the base for your sauce, sink your rabbit back down in there for its braise.

Sink rabbit back into sauce, place lid, and put in 350 degree over until rabbit is fork tender, about 30-45 minutes (alternatively, heat sauce and rabbit until slightly bubbling and place in 175 degree oven overnight with lid slightly ajar, or about 8 hours).

IMG_8333

Serve with its veggies and sauce, or serve over quinoa pasta or zucchini noodles.

Serve with rabbit, vegetables, and juices or over pasts (quinoa pasta or quinoa dumplings!) or zucchini noodles. Garnish with chopped parsley. Serve with Amarone wine.

Easy Chile Verde….or just Damn Good Pork

0
IMG_7818

Chili verde with jalapeno pimento cheese (Palmetto Cheese brand), fried egg, and a fried green tomato!

My love affair with pork…it’s a long-standing one. Frankly, it’s in my blood being a Southerner and all. I like it all…bacon (bacon!!!!), pork loin, smoked pork, pulled pork, cracklins’…you name it, I love it. Chili verde, simply braised pork chunks in a green chili and/or tomatillo sauce, is some seriously good pork eats. I frankly have never had a bad chili verde. It really goes well with ev-e-ry-thing. Slap some on a fried egg or fried green tomato or make yourself a little taco salad with a chipolte dressing. Roll that goodness up in a burrito (or lettuce or kale wrap) or throw it in some soup (white bean chili!). It pairs super well with jalapeno pimento cheese (what the hell doesn’t???). Or my favorite….straight off the fork! Good news is this recipe is super easy and can bypass any slicing and dicing. It even cooks while you sleep! My kinda business. Now you know where the ‘slap it on a fried egg’ comes in…waking up to a house full of porky goodness begs one to immediately fry up an up an egg and go to town while standing over the kitchen counter in your housedress. Yep, it’s that good. Here goes…

Easy Chili Verde

  • 5 lb Boston Butt (do not remove fat pad)
  • 1 jar green salsa (as spicy as you like it)
  • 2 cups Mojo Crillo marinade (get the ‘crillo’ since it has no MSG)
  • crock pot

Rinse pork. Throw it in the crock pot fat side up (for Pete’s sake, don’t cut the fat off!!). Toss in the whole jar of green salsa and 2 cups of Mojo Crillo.

IMG_7814

Dressing up the pork!

Put the lid on your crock pot and set it on low and let it simmer away overnight. I usually set mine on low for 10 hours and it’s perfect. You can get all fancy and add sliced peppers and onions in the beginning-they’ll add flavor, but will completely break down. Not to worry. Shove the juices (after cooking) and peppers/onions through a fine sieve and you have yourself a serious sauce. Plunk the pulled pork/pork chunks back down in that sauce and you’re in business! If you want to keep the peppers and onions intact, you’ll have to wait and add them a few hours from the end.

IMG_7820

Too delicious!

Now go forth and slather your porky goodness over whatever you can think of—you won’t be disappointed.

Noodle-less Lasagna

0
IMG_6166

It is possible-tasty and noodle-less!!

I mostly gave up all wheat and grain products about 3 years ago (um, you still need to celebrate birthdays people!). For the most part, I haven’t looked back because I feel so much better. It’s pretty easy to find substitutes for crackers (cucumber rounds, red peppers, vegetable crackers), but living without pasta can get a bit difficult. I found ways to use vegetables for spaghetti, but often missed a big ol’ pile of lasagna. That is until I used butternut squash as the lasagna noodles. If it is sliced thin enough, you don’t even notice it. You get to enjoy your lasagna and not roll around the next day with joint pain, puffy fingers, and a headache (seriously, no one likes a wheat hangover!).

Don’t worry, this is super easy and you can pick up a handheld mandolin for super cheap. If you’re trying to cut down on carbs, increase your vegetable intake, or are gluten intolerant, you’ll be super pumped to get your hands on this lasagna. You won’t regret it!


  • 2 medium or 1 large butternut squash
  • 1 bunch swiss chard (spinach or kale would work too), blanched
  • 32 ounce container ricotta (or make your own)
  • favorite lasagna sauce/filling (I prefer a Bolognese)
  • 2 cups mozzarella
  • 2 cups aged Asiago


Peel your butternut squash. Slice in half lengthwise. This might require you rearing back and hacking the knife into the middle of the squash and then beating it on the cutting board until the knife runs through. Hey, that’s at least what I do! Scoop out the seeds with a spoon and discard. Cut each half in half again crossways to make two smaller pieces.

IMG_6145

Your ‘noodle-less noodles’ in the making.

IMG_6146

All sliced up!

Now get to slicing-CAREFULLY-with the mandolin (these things can take a fingertip off in a skinny minute!).

IMG_6148

‘Noodles’!

Place your slices on a parchment lined baking sheet and bake at 350 degrees for 15 minutes or so, flipping once about 1/2 way through. You want them to be soft and to release some liquid, but not be mushy. They’ll cook more later.

IMG_6155

Put a little ‘glue’ in the bottom of your casserole dish.

Place a bit of your sauce (Bolognese-you won’t be sorry!) in the bottom of your casserole dish.

IMG_6156

Layering your junk. Get creative, use different cheeses, or veggies. Got nuts!

IMG_6162

Again, get creative! Here is a noodle-less lasagna layered with fresh mozzarella.

Layer your slices in a single layer, overlapping slightly. Spoon about 1/3 of the ricotta on top. Layer 1/3 of the swiss chard. Spoon about 1/2 of your sauce (Bolognese!) on top. Layer again with squash slices, ricotta, chard, and sauce (Bolognese-are you getting the hint?). Repeat one more time. Top with cheeses.

IMG_6158

Layer it up!

Bake at 350 degrees until bubbly and the cheese is just starting to brown.

IMG_6164

This is the molten lava stage-do not…I repeat…do not dive in. You will regret it 100% and then not be able to taste anything for days. Trust me, I am impatient!

Practice all restraint and patience to avoid cutting immediately as it is molten lava right out of the oven and will burn the bejesus out of your mouth. I speak from experience. No throwing your head back, rolling the molten food around in your mouth, and huffing while trying to exclaim explicatives and laughing at yourself. You. Can. Do. This. Just wait. Your patience shall be justly rewarded, I promise!

IMG_6166

Holy Lasagna! It is good, good, good!

Slice after about 10 minutes and dig on in. No blistered mouth in site….just eye rolling and a happy stomach!