Cured Egg Yolks

0

So, I’ve decided to conquer the yardbird. It seems I tend to tackle certain foods or techniques every season. Three was the season of shortribs and braising (and waist expansion). The season of learning how to master my smoker. The season of soups. The season of the barbecue. I really tend to avoid chicken. It is just so much work. And I usually love the skin or sauce more than the actual chicken. But I’ve decided I will conquer that yardbird (Yaahdburhd if you’re into the correct southern pronunciation)! To get going, but not ruin my day, I decided to start where the chicken started…the egg. Don’t worry, I’ll move on to the whole chicken later, but we’re starting with something I already love. Now that we know why we’re tackling this egg, why cure it? Salt. Fat. Umami. Fun. Need I say more? And hey, if the Zombie Apocalypse hits, you’ll still be able to eat like a king!

Don’t go thinking I’m some kind of culinary genius. Salted, cured egg yolks have existed for a long time in the form of Bottarga. Bottarga is salt cured fish roe sacs. Don’t worry a bit, with shad roe season starting here, we’ll be making some of that too! I digress. Salted hen yolks have a slightly salty, fatty, magical flavor. They’re quick and easy to make and can totally transform pasta, salads, and soup. Just use a fine grater or micro planer to give your dishes a little dusting. I’m practically drooling thinking of a yukon gratin with sage and a little dusting of cured egg yolk.

To kick off your cured egg yolk addiction:

  • 1 container, about 2 inches high, 8 inches long, and 6 inches wide
  • 2 cups of Kosher salt
  • 2 cups of sugar
  • 4 egg yolks (freeze the whites in ice cube trays for later use, make a little Angel food cake, or make some cloud bread)

Thoroughly mix your salt and sugar and place a decent layer in the bottom of your container. Make four little nests in your mixture with the back of a spoon. Separate the whites and yolks. Place each yolk in its nest.

IMG_3288

Just look at that little golden globe of goodness!

Gently cover with the rest of the salt-sugar mixture. Place your lid and tuck into your fridge. Let sit for 1 week. After the week has passed, gently remove the yolks from your mixture. They will be slightly translucent and the firmness of a dried apricot.

IMG_3435

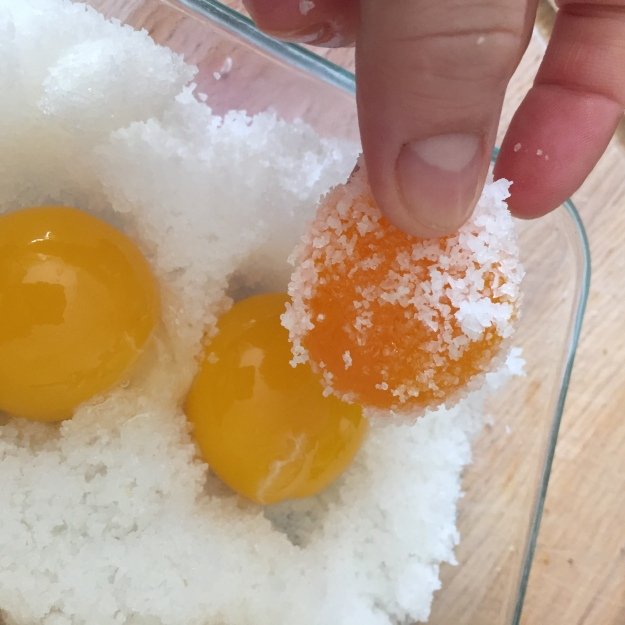
You can see the difference between fresh egg yolks going down for a little salt slumber and those that I’ve just dug out of their cozy cocoon.

IMG_3434

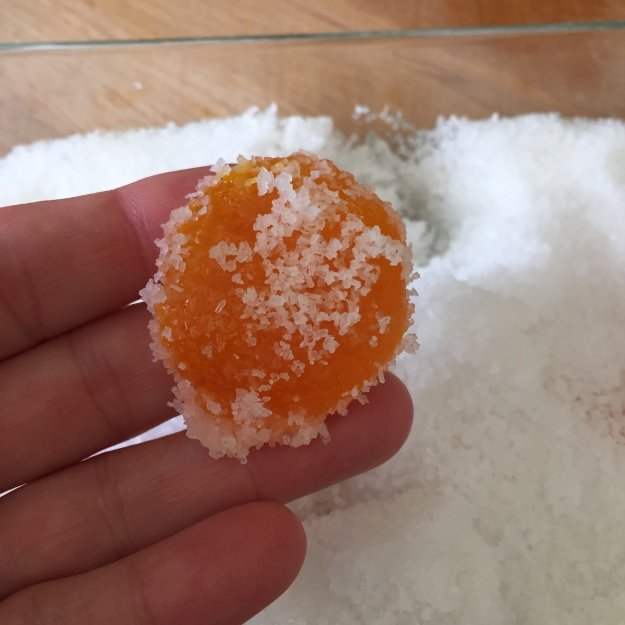
These little gems are like adult salty jelly beans!

Rinse in cold water and pat dry with paper towels.

IMG_3437

Don’t be afraid of the cold water rinse. It’ll get rid of excess salt and the yolks won’t melt.

IMG_3439

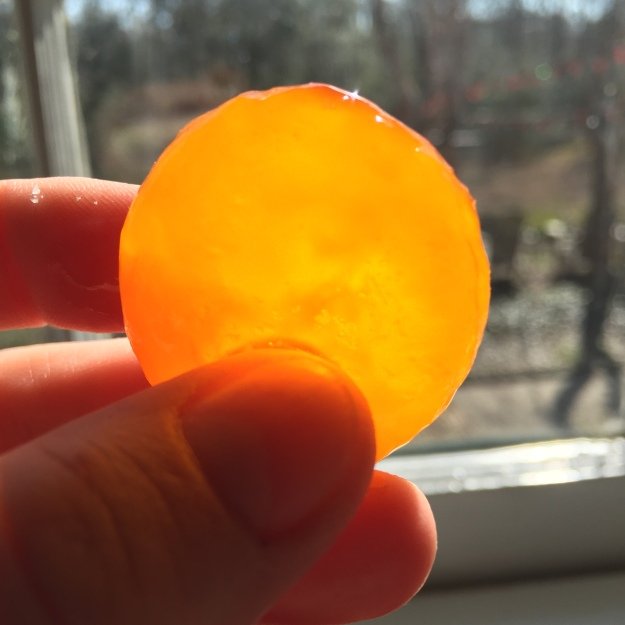
Good morning sunshine!

Place in a dehydrator set at 145 degrees. Dehydrate for 3 hours or until firm.The yolks will continue to firm up as they cool. Grate, grate, grate away! They’ll last a month in a sealed container in the fridge, but I guarantee they won’t stick around that long!

IMG_3445

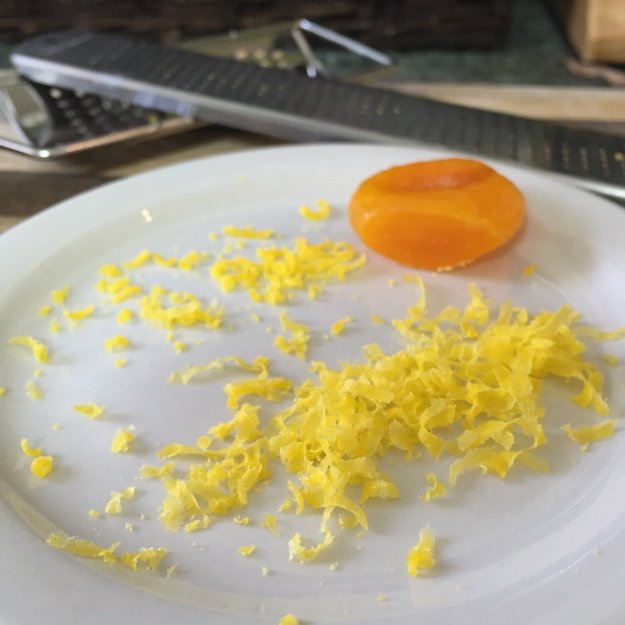
Serious goodness. I prefer the uber thin tendrils produced by a micro planer, but the slightly more dense shavings produced by a grater work well too and may stand up to robust dishes a little better. Either way, just get that goodness on there!


Best Beet Pickled Eggs

2
IMG_6801

Beet Pickled Deviled Eggs

Grumpy Kevin and I first had a version of these eggs in Portland, OR at Gruner, a fantastic German restaurant. If you’re ever in the area, you should stop by as it is truly a delightful place. Beet-pickles eggs are popular in Pennsylvania Dutch country and a beetless variety can be found in pubs. We were head-over-heels with Gruner’s version of these eggs, beet-pickled, then deviled, with what we think was the tiniest horseradish shavings on top. The contrasting pink and yellow was striking and the taste was out of this world. I have been searching through recipes ever since! After reading dozens of recipes, I decided to take the plunge, combining a bit of all of them, and the result was fantastic! I kept the beets on the firm side so there was a little toothiness to contrast the soft egg and I used red onions to provide a little heat (like the horseradish). These make a great snack (make sure to get a bite of egg, beet, and onion together!) or are an excellent accompaniment to a salad.

  • 1 dozen eggs, boiled, peeled
  • 1 cup of apple cider vinegar
  • 1 cup of water
  • 3 TBSP sugar (try substituting honey, beet sugar, or coconut sugar)
  • 1 tsp salt
  • 1 tsp black peppercorns
  • 2 garlic cloves, mashed and chopped
  • 1 bay leaf
  • 1/2 tsp dried dill
  • 1/2 gallon ball jar or other large container
  • 1 pound beets, peeled, sliced thinly, and boiled in just enough water to cover (reserve water)
  • 1/2 large red onion, sliced
IMG_6780

slice your beets thin, about a quarter of an inch

IMG_6783

red onions and plenty of garlic add a little heat

IMG_6791

a dozen eggs should do it…fresh eggs will be a bit harder to peel but the flavor is well worth the trouble

For farm fresh eggs in the greater Charleston area, try Wishbone Heritage Farms!

Combine the vinegar, water, sugar, salt, peppercorn, garlic, and bay leaf in a sauce pan. Bring to a boil, stir to melt sugar, reduce and simmer for about 5 minutes. Let cool 15 minutes and add dill.

IMG_6788

combine the pickling spices, bring to a boil to melt the sugar, and let it cool before adding the dill

Layer eggs, beets, and onion in your container

IMG_6795

layer the eggs, beets, and onions

Pour over the vinegar mixture. Add the reserved beet juice to cover.

IMG_6792

Pour the spiced brine over the layered eggs. What a color!

IMG_6793

It’s hard to wait for them to pickle!

Let sit until cool, about 1 hour, uncovered on the counter. Place lid and refrigerate at least 6 hours. Eggs and beets will keep for 1 week. The longer they sit, the more pink they will become and the further the pink penetrates the egg. So if you want just a pink ring when they are cut open, go with a shorter pickling time.

IMG_6798 2

Seriously, you can’t ask for a more beautiful egg! This would be perfect for Easter, luncheons, teas, or just a great snack!

IMG_6801

Devil the yolks and grab a bite of the egg, beet, and onion. Delish! Try adding grated horseradish, wasabi powder, or some spicy dry mustard for variations. A bit of turmeric can make the yolk even more yellow when deviling.

IMG_6804

Just perfect on a salad with a slightly sweeter vinaigrette. Not bad to look at either!