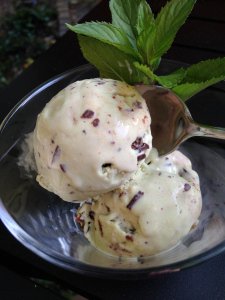
Cool and refreshing mint chocolate chip ice cream!
My love affair with ice cream goes way back. Sometimes on Sundays my Grandparents would pack my brother and I up in the car and take us ‘over the bridge’ to an ice cream parlor that had all the toppings under the hood of an old red ’57 Chevy (aptly named ‘The Ice Cream Machine’). I stared in wonder as they ate ‘weird’ flavors like pistachio, coffee, or butter pecan. I mean why wouldn’t they be eating the bubble gum filled variety with sprinkles, gummy bears, and chocolate??? Despite a long love affair with ice cream, let me say I’m not a huge fan of mint chocolate chip ice cream…pistachio, yes. Brown sugar ice cream, yes. Even beet lemon (it’s good, I swear!), yes. Mint chocolate chip, meh. Why then, you ask, would one go through all the trouble of making fresh mint chocolate chip ice cream? Simply, a massive overload of mint springing forth from the garden and a guilty conscience for throwing it away. Well that, and a little boredom and a bit of time on my hands. Then there’s the challenge of homemade ice cream in itself. When a batch of homemade ice cream turns out really good, it’s like The Culinary Gods have shined down upon you. Sometimes I’m so happy with myself after a batch turns out good that I’m almost too proud to eat it. Then common sense kicks in. So, you could also say I was up for the challenge.
Now, those that know me know I don’t really jive with processed food. So, why the light corn syrup? Well, there’s some molecular chemistry involved and it basically has to do with how the ice cream freezes-the corn syrup prevents the ice cream from getting all crunchy from ice crystals. Yes, it doesn’t go with my ‘no processed food’ philosophy, but frankly, you’re not dining on this stuff all that often, so it’s not a deal breaker for me. You can make your own corn syrup if you’ve got a vat of corn and some serious time and patience, but I have to draw the line somewhere! You can try other techniques, like using a corn starch slurry or using honey or other emulsifiers, but this seems to work the best for ice cream in a home machine.
Don’t be daunted, it’s pretty easy and you’ll be glad you did it once you take a bite! It’s not like the stuff from the store-all fluorescent green and mint-extract flavored. It’s a creamy, herbal-mint with just the right amount of chocolate. You can certainly taste the nature in it! As much as I generally scan right over mint chocolate chip ice cream in the store-this one makes me take a bit of a pause!
- 2 cups whole milk
- 1/2 cup sugar
- 1/2 cup light corn syrup
- 3 cups heavy cream
- pinch of salt
- 3 cups packed fresh mint leaves
- 10 large egg yolks, whipped
- 8 oz dark chocolate, melted (Lindt Dark Chocolate with a Hint of Sea Salt used here)

Fresh mint leaves are a must!

Heating the leaves in the milk releases the oils.
Place milk, sugar, light corn syrup, 2 cups of cream, salt, and mint leaves in a saucepan over medium heat. Heat until steaming, stirring occasionally to prevent curdling. After it’s good and steamy, put a lid on your pan and let it steep off of the heat for about an hour or so.

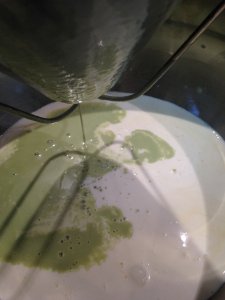
The mint has released all of it’s flavorful oils.
After steeping, pour through a fine mesh strainer while pressing down on the leaves to release more oils (a bouillon strainer works wonders!). If you get a few little leaf bits in there, don’t worry-it’s homemade! Pour the mixture back into the saucepan and reheat. Very slowly pour about 1/2 of the hot milk mixture over the egg yolks while constantly whisking to prevent cooking the egg yolks. Combine the hot milk and hot milk-egg mixture in the saucepan and heat slowly, stirring constantly, until the mixture coats the back of a spoon.
Cool the ice cream batter by mixing back into the last cup of heavy shipping cream.
Pour this mixture into the last 1 cup of heavy cream while stirring. Let cool and place a piece of plastic wrap over the top, pressing into the surface.

Chill the batter with a piece of plastic wrap pressed into the surface to prevent the ‘skin’ from ruining your texture.
Chill overnight.
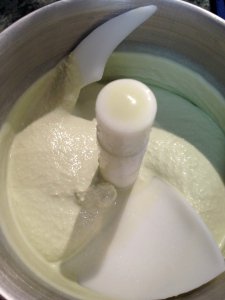
Freeze the batter in 2 batches (drizzling chocolate in between) in a home ice cream machine according to directions.
Place 1/2 of batter in home ice cream machine and freeze according to machine directions.
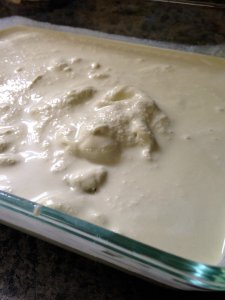
Preparing for layering of chocolate-this makes the chips!

Making the chips!
Place frist half in flat container and drizzle 1/2 of melted chocolate over the top. Put the lid on and place in freezer. Run the second half of the batter according to machine directions. Layer on top of first batch and drizzle second half of chocolate over the top. Place lid and freeze until firm.

Summer on a spoon!
Homemade ice cream freezes harder than store bought because we don’t whip tons of air into it (arrrghhhhh-you’re paying for air?!?!?!?), so you may have to let it sit out for 10 minutes or so before scooping. All this may seem like a bit of work-but seriously, it’s summer on a spoon and you know exactly what’s in it (no Incredible Hulk colored ice cream for me!).
Try it, I promise you’ll love it!
**Note: Monkeying with sugar and fat content can alter the texture**
